In Blender, the ORIGIN is shown as a blue dot. Every object has one. Some users refer to them as the rotational point but origin is Blender's term for them. The reason that 'rotational point' is used is because that's the point in which the object will rotate (will see a bit later). When in EDIT mode, you don't generally move an entire object. If you do and select all parts (vertices, edges and faces) of the object, the origin will remain behind. This may or not be intended but you should know that it will happen. Don't let it be a surprise when you go back to OBJECT mode and rotate or position the object (via the text fields) and the object doesn't react as expected. It's fairly simple to get the origin back to center mass on the 'primitives' that are available in Blender. To see this in action, open
THIS Blender file.
-
If doing this, remember that you can use the ESCAPE key to stop the operation before you confirm it by hitting the ENTER key or clicking the LMB. Even if you confirm the operation, you can undo with your best friend, undo (CTRL-Z). Remember, you can't mess anything up because, even if you save a bad file, all you have to do is come here and get a new one.
-
Click to highlight one of the cubes.
-
Click the R key on your keyboard and move your mouse.
-
You could alternatively, click RXanyvalue (like RX5 or RX45) to see how each reacts.
-
Try selecting both by selecting one, then SHIFT (hold down) and select the other. Both will have a glowing margin when selected. Then try the previous actions with both selected.
-
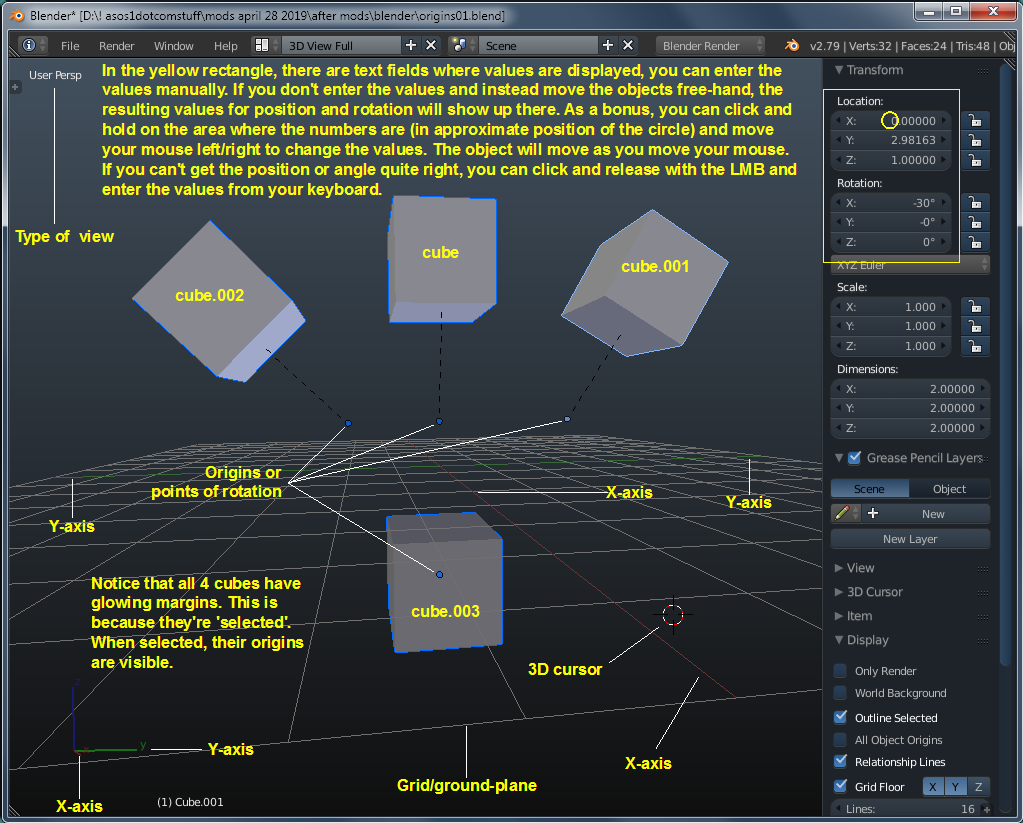
Select one cube (the blue cube) and rotate it by clicking and sliding your mouse in one of the text fields in the N-panel.
Don't just use the R-X option. Try RY and RZ as well. Try using two axes of rotation. Click RXRY. or RXRZ with both selected. Remember that clicking and holding down the MMB and then moving your mouse will let you change the viewing angle. The mousewheel will allow you to zoom in or out.
This shows that the origins are no longer where they originally were (as in cube.003), in the center mass of the object. It also shows that the point of rotation is around the origin, not the center mass of the object. THIS is the Blender file. Feel free to open it and move as described in the graphic below. Remember, right click to select an object. Only the selected object will move in relation to the numbers in the N-panel.
There is a more complex (but not difficult) procedure for getting the origin in a specific location, below, but for simply getting the origin back at center-mass, it's this easy.
-
Select the object that you've been working with.
-
Press CTRL-SHIFT-ALT-C (all at once) to open the SET ORIGIN menu.
-
Choose the ORIGIN TO CENTER OF MASS option from the menu. You should have seen the origin move to the center of the bottom face where the 3D cursor was located.
Below:
EDIT mode is this color. OBJECT mode is this color.
-
This is one process for getting the origin to the center of the bottom of an object. The center of the bottom of the object is where the origin needs to be to center the object on any specific point. The process have to switch between the OBJECT and EDIT modes due to the option available in this version of Blender. There are other ways to do it.
-
As always, to switch to EDIT mode, you must have an abject selected so select the cube (if you simply opened Blender for this and don't have anything else).
-
Click the TAB key to switch to EDIT mode. Remember, your mouse cursor must be over the 3D workspace to be able to switch modes with the tab key.
-
In some instances, parts of the object may already be selected. Make sure that none are by clicking A one time. If nothing was selected, everything should have lit up in bright orange. Click A again. Everything should have gone dark (normal).
-
Orient the object or move your viewpoint so that you are facing the bottom of the object.
-
In edit mode, you can select all but here, you only want to select the bottom face of the object. The select mode is likely VERTEX. To switch to FACE mode, use CTRL-TAB and select FACE from the menu.
-
Select the bottom face of the object. It should have changed colors when it was selected.
-
With your cursor over the 3D workspace, click W to open SPECIALS menu.
-
Select SUBDIVIDE. This should give you 4 divisions. You can select more from the menu in the T-panel.
-
Click CTRL-TAB and select VERTEX.
-
Select the center vertex that was created when the bottom face was subdivided. The center vertex is what's critical here because we want the origin centered on the center of the bottom of the object. If you want the origin at any other point, place the cursor at that point. You don't even have to use edit mode to move the cursor to the 3D cursor. That can be done in OBJECT mode alone.
-
Click SHIFT-S to open the SNAP menu and select CURSOR TO SELECTED. This will send the 3D cursor to the selected vertex.
-
Now, it's important that the cursor doesn't move from this vertex so don't click in the 3D workspace in a way that would move the cursor. If you do, it's the end of the world as we know it... NO wait!, it's NOT the end of the world. All you have to do is go back to edit mode and repeat the step above.
-
We're done in EDIT mode but must switch back to OBJECT mode...
-
Press TAB to switch to OBJECT mode.
-
Select the object that you've been working with.
-
Press CTRL-SHIFT-ALT-C (all at once) to open the SET ORIGIN menu.
-
Choose the ORIGIN TO 3D CURSOR option from the menu. You should have seen the origin move to the center of the bottom face where the 3D cursor was located.
-
Press SHIFT-C to center the 3D cursor on the grid.
-
Now, if you get the object oriented properly and near the 3D cursor, you can use the use SHIFT-S to open the SNAP menu.
-
Choose SNAP TO 3D CURSOR. Your object should have snapped to the center of the grid.
Back to the Top

