|
Basic Chainsaw Safety when Working with Fallen Trees
Overview:
This page is mainly for those who are not very experienced when using a chainsaw or removing a downed tree but want to (or have to) do the job themselves. This is by no means all you need to know about using a chainsaw but it will hit on some of the things that will help reduce the potential level of frustration and help to keep you safe.
Needs to be Stated Before You Get Bored and Leave this Page:
Many people will want to burn all or part of a tree that has fallen. This is especially true where there are no municipal services to pick up the tree after you cut it up. Do NOT repeat DO NOT use gasoline to start a fire. Gasoline ignites explosively. The fumes follow along the ground surrounding you when you pour it. If you have to burn brush/limbs/etc..., stack the small, dry branches and maybe a bit of paper in the pile first. Then place the larger pieces on top of that. If you need to use an accelerant, use charcoal lighter fluid to get the paper and smaller pieces started. Again... Do NOT use gasoline (not even a small amount) to start a fire.
While on the Subject of Burning:
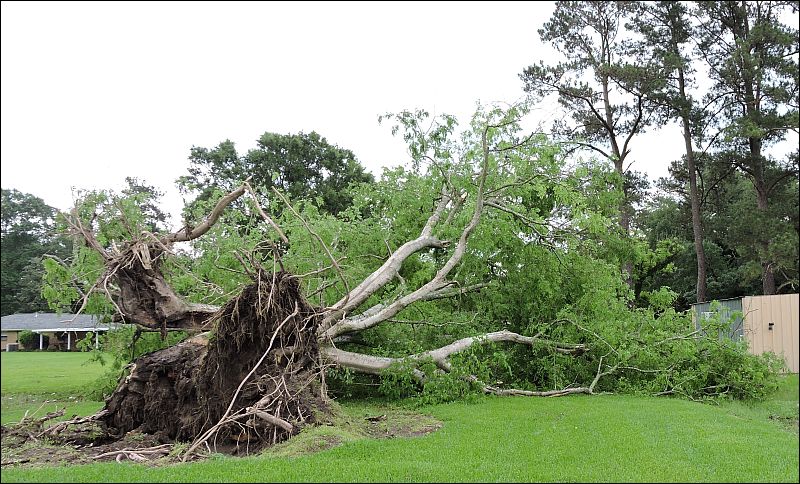
When a tree is uprooted, it will leave a hole and a root ball that is full of dirt. As you know, letting even a tiny bit of dirt to contact the saw chain will almost immediately result in a dull chain. To solve two problems at once, move all of the wood you want to burn against the root ball. This will burn the roots and lower trunk and will help fill the hole left when the tree was uprooted. Burning it will eliminate the need to cut the dirty roots and prevent dulling your chain.
When cutting the root ball from the trunk of a tree, the root ball may try to fall back into the hole or may be forced to stand up due to tension in the roots that are still connected. When cutting the root ball loose and keep everyone away from the root ball and the hole left when the tree was uprooted. There may be a delay in the root ball moving and can do so unexpectedly. Burning the roots (by burning other parts of the tree in the hole) will weaken the remaining roots. Leaving the trunk connected to the root ball as long as possible will reduce the risk of the root ball moving unexpectedly.
If you don't have a saw large enough to cut through the trunk, burning the other parts of the tree under the trunk can eliminate the need to cut it.
Quick Note on Burn-Bans:
Before burning anything, you need to find out if there are any restrictions on burning where you'll be cutting the tree. Where I live, 'burn-bans' are put into effect when there have been drought conditions. Call your local fire department to see if there are any such restrictions before burning. The fines can be quite substantial and you risk having to pay expenses when the fire department comes to put out the fire you've started (even if it's well contained with no risk of spreading).
|
Read the Owner's Manual:
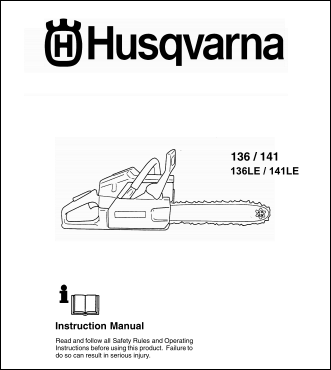
I know that this is the standard recommendation by anyone who is trying to help you learn something new. There's a reason for that. Most owner's manuals include good information to help prevent you being awarded (posthumously) a Darwin award. It's best to read the owner's manual for the saw you're going to use. Most are available for free from the manufacturer's website. This manual is for one of my saws. It's a Husqvarna 141. It's an old saw but the information in the manual is very helpful. Other manuals provide much the same information.
|
Think:
This section may seem condescending. That's not intentional but simply saying be careful probably won't get your attention. It's important that you take your time and think ahead. Gravity is unforgiving. When you do this type of work, it's often difficult to tell what the tree and limbs are going to do when they're cut. If you have a lot of work to do, do the simple stuff first. That gives you a chance to clear the area of smaller pieces and will give you time to think of several ways to do the work that's more risky (for really risky work, call a professional). It will also allow you to get a feel for the saw and get your 'sea legs' walking in and around the tree you're working on. It's best to have a clear area to walk through when making all of the cuts. This includes the small limbs that will need to be cut. If you have help (especially those who are not going to be cutting), have them pull the cut branches away from the work area. They don't have to haul and pile them up. Just pulling them back 5 feet to clear your work area will make a huge difference. If you can get them to pull the cut limbs back as soon as they're cut so you always have a clear path, that will make working much safer. This applies to branches that can be easily pulled without getting close to you and the saw. Use your best judgment when working with helpers.
When you finally determine the best way to do the more risky work, leave yourself a lot of room to get out of the way of any fast moving piece of lumber. Have at least two escape routes at 45° angles to the line on which the tree or limb is falling. These paths must be clear of all logs and brush. Even small vines can trip you so don't discount anything. If there are no clear paths, take the time to make them before you begin cutting. Before you start the cut, make sure that you have good footing. Look at the line where the saw's bar and chain will pass and make sure that you're well out of that path.
I know a lot of guys want to show how manly they are (been there, done that) but if you are not careful, all you're going to do is show that you're good at getting hurt. Remember, wood is very heavy. A seemingly small piece can weigh 100+ pounds. That weight dropping a very short distance can break bones. I can assure you that everyone is going to be more impressed if you can get the job done and go home safe than if they have to go visit you in the hospital... or worse. If you know what you're going to encounter, or if you encounter something unexpected, search youtube for tutorials from PROFESSIONAL arborists on the best way to handle moderately tricky jobs.
Safety Equipment:
It should be obvious that you need to use proper safety equipment to prevent injury when using a chainsaw. At the very least, you need both hearing and eye protection. Hearing protection can be as simple as foam earplugs or as complex as active earmuffs. These were covered on the hearing protection page of this site. You should also wear protective footwear with a good, deep tread to prevent you from slipping. A steel-toe in the boots is a definite advantage. Although amateurs should not try any cutting where they are not on solid ground, those who try trunk-walking to cut limbs should wear boots with metal spikes. If you're doing only light trim work, a hardhat probably isn't necessary but if you're cutting anything else, you should wear one. Many times, when a tree that's not healthy is cut, weak limbs or even a large part of the top of the tree will break out of the tree and fall straight down onto you (those pieces will not follow the top of the tree away from you as it falls). Even when a tree is on the ground, it's possible for limbs to twist when they fall. This can lead to a loaded branch hitting you when it's cut. There are 'forester's helmets' that are a hardhat with attached mesh shield for eye protection and earmuffs for hearing protection. Many of the injuries from flying hooks (from mishandling, not from straps/chains/cables broken under tension) can be avoided by wearing the proper safety equipment. A standard hardhat ($5) and safety glasses ($3) can offer a lot of protection if you don't have a forester's helmet.
The forester's helmet mentioned above has a protective mesh screen. The safety glasses below also use a mesh to protect your eyes. I live where it's very humid. Safety glasses are always fogging up. These will not fog. They take a bit of getting used to (looking through the mesh) but are my first choice. These have an elastic band to hold them on. You can get them with standard eyeglass temples if you prefer.

Chainsaw Chaps/Pants:
Chainsaw chaps are a protective covering for your legs (open in back). Chainsaw pants... are pants. They are like normal pants except they provide protection from accidental contact with the chainsaw. Chaps come in two main types. One type only covers the front of your legs. The other type covers the front of the thighs but wraps around the lower leg from the knee down. Chaps are cooler to wear in the summer.
Bear in mind that these are not to provide repeated protection. If you're attentive and careful, the running saw should never make contact with them. If it does, they will be very badly damaged but may prevent serious injury (fatal injuries are still possible when wearing protective clothing). When the chainsaw comes in contact with them, the chain grabs hundreds of polyester fibers which get pulled into the saw's drive system and bind it. To clear it, you have to pull the chain and bar off of the saw and remove the individual fibers. After they're damaged, you must replace them. A second contact with the chain in the same general area may result in zero protection if too many of the fibers have been pulled out (fibers are pulled from a relatively large area). Some chaps will come with additional layers of protection (like Kevlar panels) but that's generally for the most expensive versions.
Please note that the chaps must fit securely. If they're too loose and can easily slide on your leg, the saw may simply grab the outer cover and rotate the chaps so that bare skin is exposed (completely unprotected from the moving chain). Remember, the internal fibers are what protect you by binding the saw. If the saw can't cut through the outer layer because the chaps won't remain in place, you will be injured.
Wear Gloves:
When doing this type of work (especially if you're not used to hard work), wear gloves. There are many types. For the best protection, you should wear gloves designed to protect you from the chain (like the chaps/pants mentioned above). They're more expensive than generic work gloves but offer more protection from accidental contact with a moving chain. Since these are expensive, you may opt a different pair of gloves for other work (material handling, etc...).
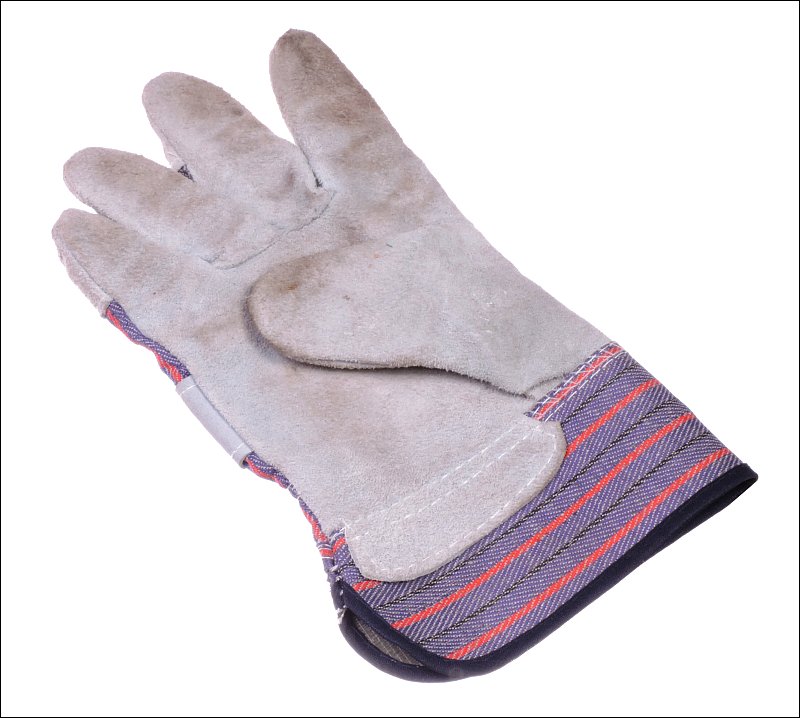
Many people like the cotton gloves with the black PVC beads. For work that doesn't require significant protection but requires a good grip, I prefer gloves with rubber coating where you need good grip but open weave on the back of the hands (first image below). The gloves with the rubber palms could almost be considered sticky and give a very secure grip. For the best protection from punctures and pinching (working with cables and chains), leather gloves are probably the best. While leather provides better protection, it makes it more difficult to handle small objects. Gloves are inexpensive. You should buy both types (and any others that you think may be better for you).

Most new(ish) chainsaws have vibration damping. For those that do not, you may want to buy gloves that have added padding in the palm and finger areas. These are also good if you have a chainsaw that sometimes jerks back hard when you're trying to start it. What's normally painful simply becomes annoying.
Don't Work Alone:
When cutting trees (most likely what you'll be doing when using a chainsaw), you should have another adult with you that can handle most all emergencies or be able to get help. Don't rely on a cell phone. If there's an accident, the phone could be damaged. When working, you and your partner/helper need to watch out for each other. Sometimes when working, the other person may spot something that could be dangerous. At that point, work should stop to kick around ideas to determine the safest way to approach the problem.
Keep Pets and Young Children Out of the Work Area:
I'll keep this simple... If you don't want to look into the eyes of a dying pet that was crushed under a heavy piece of timber, keep them on a leash and keep them tethered well away from the work area. You may want your pet to have 'fun' but I'm sure that you don't want to lose a beloved pet. You should not bring young children to the worksite. Leave them with someone you trust. If you have older children, you will have to evaluate whether they're 'aware' enough of their surroundings to keep themselves safe. It's good to have help but you don't want to have someone on the worksite who isn't well suited for this type of work (moving and piling cut branches).
Know Your Limits:
It's always more likely that you'll make mistakes when you're tired. Some mistakes can be life-threatening. Less serious mistakes can still ruin a good day. For example, when tired you're much more likely to jerk on chains, straps when they become tangled or stuck. When doing this it's very easy to have a heavy hook break free unexpectedly and hit you in the head, face, eyes, teeth..., even an impact with knee caps or shins is very painful. If you're pulling hard enough and there is enough length on the chain or strap, it's possible for the hook to come from around whatever it was stuck on and hit you in the back of the head or even your back. It's also more likely for you to break a window if you're working from the back of a truck. You shouldn't be working tired but if you are, you have to be more careful in what you're doing.
Use Two Hands to Control the Saw:
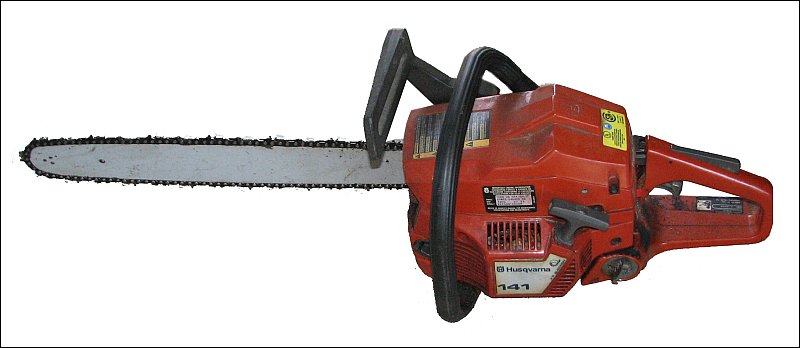
If you're not a professional arborist (you probably wouldn't be reading this if you were), you need to always use two hands to control the saw. Even small saws have a lot of power and cannot be controlled safely with just one hand, especially when it kicks-back. Kick-backs are when the chain at the tip of the bar grabs and throws the saw back at you. Saw manufacturers include various types of kick-back protection on most saws. The paddle (hand guard) in front of the forward handle (can be seen in the image below) isn't there just to protect your hands. When you're holding that handle and the saw kicks back, the hand guard impacts your wrist/arm and the hand guard moves forward, generally locking the guard in place. When the hand guard is pushed away from the handle, the safety brake stops the chain. The saw could still cut you if the stationary chain makes contact with any part of your body but the injury won't be nearly as severe as it would with the chain moving 100ft/second. Imagine 200, 300... 400 chainsaw teeth passing across (and into) your leg/face in less than one second if you make a mistake. Use both hands to control the saw. Try to always keep the saw at arm's length. If it kicks back, it will give you more time to react than if you're just inches from the moving chain.
A second type of kickback protection is a tip-guard. The tip guard prevents the chain at the tip of the bar from contacting anything by shrouding the tip of the bar. These are good for those who are making nothing more than cross-cuts on pieces that are no longer than the bar on the saw. For plunge cutting and cutting logs with a diameter larger than the length of the bar, you can't use tip-guard.
Now that you know that your wrist actuates the brake, you should realize that using the saw laying on its side (with your hand on the side of the wrap-around handle, not the top of the wrap-around handle) means that the kickback protection is not going to be effective. When cutting with your hand on the side handle, be sure to keep your body on the bottom side of the saw. That way, if the saw kicks back, it will go away from your body and not towards it. No one should be close enough to you when cutting to be hit with the saw but when cutting like this, it's that much more important that everyone is kept clear of the area.
Testing the Chain Brake:
You need to test and confirm that the chain brake works. There are two different ways to test. Initially, test with the engine off (repeat... OFF). Make sure that the hand guard (which activates the chain brake) is fully back. With heavy leather gloves on, pull the top of the chain away from the powerhead of the saw. It should move freely.
Next, you will check the brake with the engine running. You will never touch the touch the chain with the engine running, even if it's not moving. Push the hand guard forward (away from the powerhead). You will hear a click as the brake is engaged. Start the engine and grip the saw normally (with both hands and with fingers and thumbs wrapped completely around the handles) and rev to about 50%. Push the hand guard forward with your wrist by rotating your hand around the front handle. Do NOT let go of the forward handle and grab the hand guard. It puts your hand in close proximity to the moving chain and with the angle of the hand guard changing, you could easily slip and drive your hand into the chain. When you push the hand guard forward with your wrist (still maintaining a full grip on the forward handle), the chain should quickly come to a full stop and the engine should bog down. Try it again at full throttle. If it does not stop the chain, the brake MUST be repaired before the saw is used.
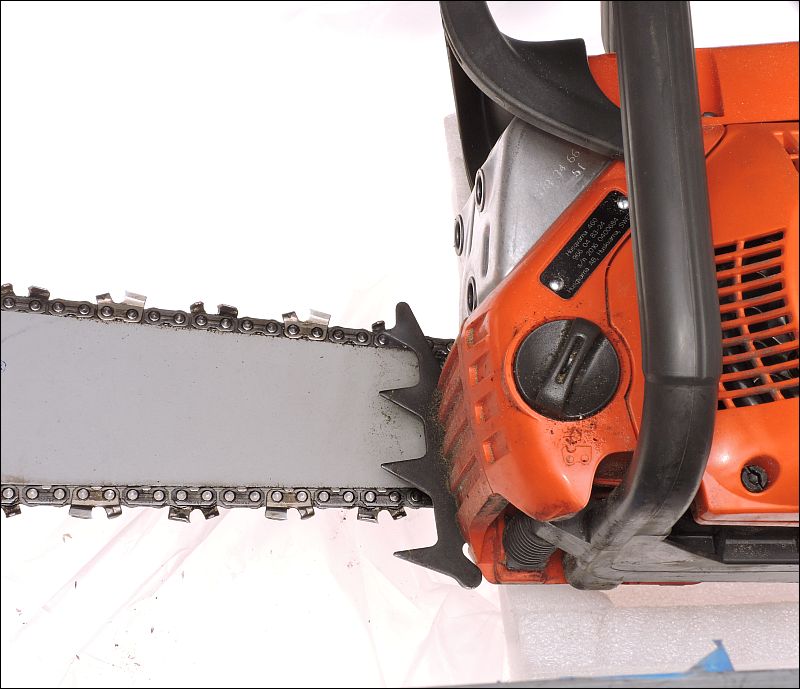
Parts of the Chain:
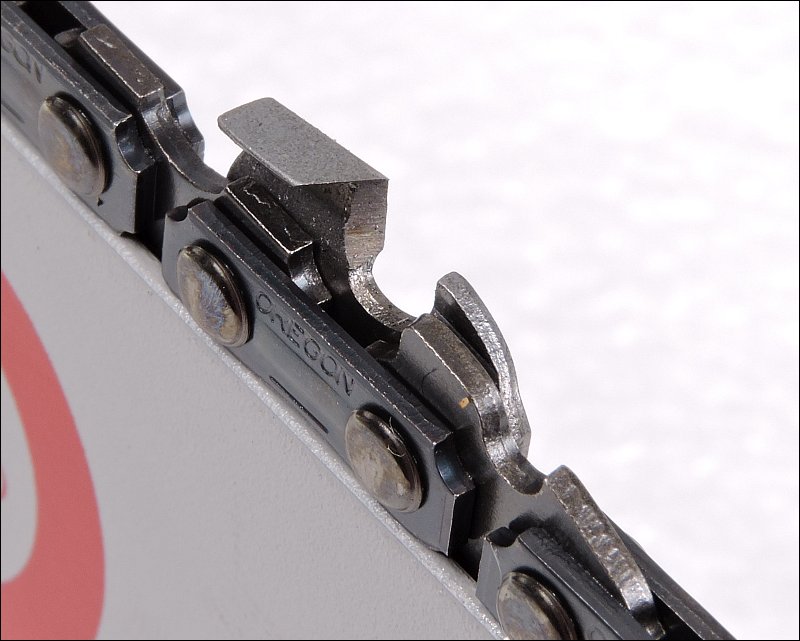
The following is a close-up of a couple of links in the chain for a chainsaw. The sharp-edged part of the link is the cutter or tooth. The projection to the right of the valley in the link is the depth gauge (often referred to as 'rakers'). The depth gauge is there to prevent the tooth from biting too deeply. If you look at the tooth, you will see that it's ground from underneath the top edge of the tooth. This has to be ground with the correct diameter file or grinder to maintain the correct profile on the tooth. After a few sharpenings, you also have to grind the depth gauges. If you do not, the teeth won't cut efficiently because they won't be able to bite deeply enough on each pass.
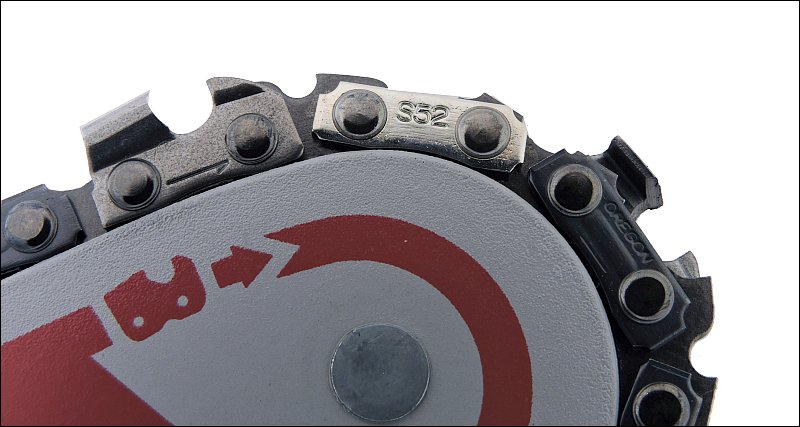
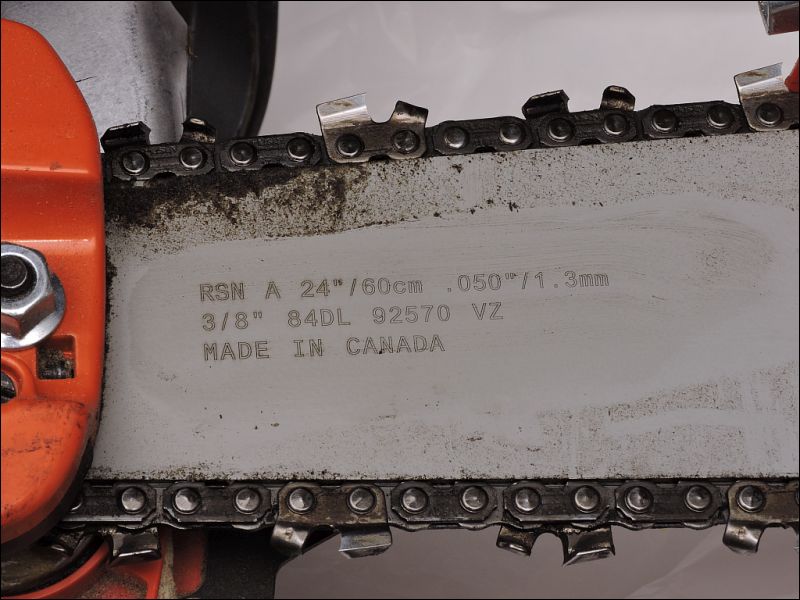
There is a fair bit of information available in the next photo. The silver link shows the type/series of chain. It is a total of 52 links. The arrow on the tooth shows the direction of travel. It must match the arrow on the bar. The manufacturer of the chain and bar is Oregon.
Above, it was stated that the two arrows must match. That's only true when the bar is installed so that the lettering is right-reading when the saw is upright. To equalize bar wear (the bottom of the bar generally gets the most wear), the bars are flipped when the design of the bar allows it (most (maybe all) do. For saws that get used only a few times a year, it's unlikely that you'll need to flip the bar unless you run the saw without bar oil. For those who use a saw more frequently (or loan it out to a lot of friends), flipping it may extend the life of the bar. Some recommend flipping the bar every time you replace a worn chain. That's probably often enough.
The following image shows the information given about the chain on the packaging. You can see how it corresponds to the information on the chain itself. This bar and chain were a 'combo' so they're going to match. When buying a chain to go on your bar, you also have to know the gauge. Here it's a 50 gauge (drivers are 0.050" thick). The original chain and bar for this saw were a 43 gauge. This chain would not have worked with the original bar. Since the original chain was $20 and this combo was $30, it was a good deal to replace them both, especially since you get a new bar with a new sprocket in the end of the bar.

In the following photo, you can see the drive links and the sprocket in the nose of the bar. The sprocket should spin freely. If it's difficult to turn, it either needs to be lubricated or the bar needs to be replaced. When you buy a new bar, turn the sprocket so that you know how it's supposed to spin. Lubricating the sprocket seems to be controversial. Some say that it reduces life, others disagree. If you do lubricate it, do so in the holes on either side of the sprocket.
Here you can see one of the rollers of the roller bearing for the sprocket tip. There is no protection for the bearings. This will fill with sawdust. If you determine that your sprocket needs to be lubricated after it's seen significant use, it may be best to clean all of the old lubricant from the bar by agitating the tip of the bar in mineral spirits. Allow it to dry and then force new grease into the bar from both sides. This appears to be white lithium grease. Contact the bar manufacturer for the recommended lubricant.
If you need to replace a bar or chain, you can find the information you'll need on the side of the bar. Saws can take various length bars/chains. As an example, a saw may have the option of using 16" - 24" bars. If you're cutting large diameter pieces, you may need a longer bar. If you're not going to cut anything nearly 24", you may want to use a shorter bar. A smaller bar is lighter and more maneuverable. It also takes less horsepower to pull the smaller chain which leaves more power for cutting.
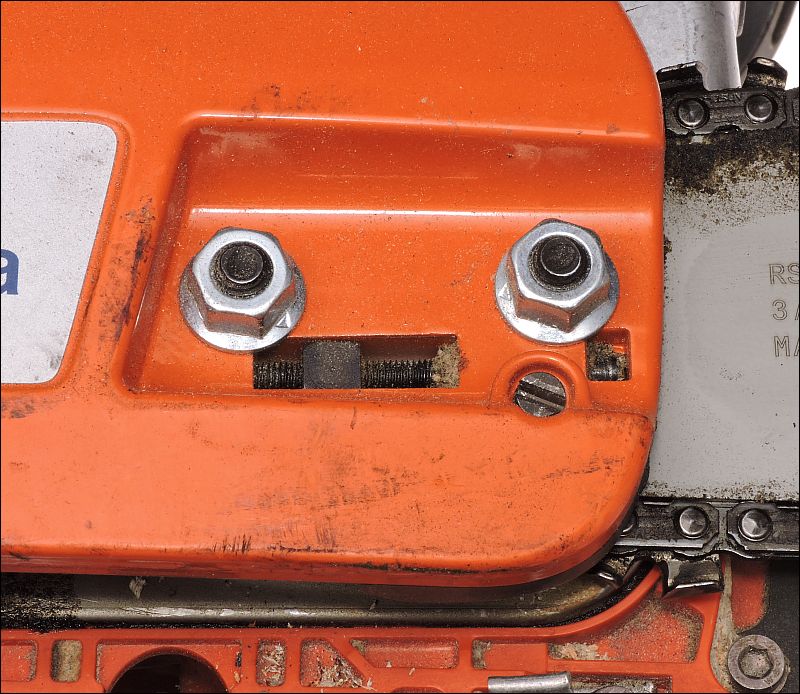
Chain Tension:
The owner's manual will tell you how to adjust the tension of the chain for your saw but in general, you loosen the two nuts (some saws have only one bar nut) that hold the bar tight and turn the adjusting screw (generally just to the left or right of the bar or on the side of the clutch cover -- as is shown on the saw below (flat head screw)). When adjusting, have the saw on a flat surface and place a block of wood under the tip if the bar/chain so that you can push down slightly in the powerhead and the bar will be pushed upward. Tighten the chain until the bottom of the chain snaps back against the bottom of the bar but still moves freely when pushed around the bar). While holding slight downward pressure on the powerhead (to keep the bar up), tighten the two retaining nuts. Re-check the tension. The reason that you hold the bar up is because there is almost always slack in the bar. When it moves upward, the chain will often get loose. Since cutting will generally cause the bar to move up, tightening the chain with the bar up will prevent the chain from getting loose. Make sure that the chain moves freely. If it does, start the saw and ease the engine speed up gradually. Make sure everything looks OK. If it does, continue to increase the engine speed until it reaches cutting speed. Run it like that for about a minute, kill the engine and re-check the tension. After each of the first few cuts, kill the engine and re-check... bearing in mind that the muffler is in that area and very hot.
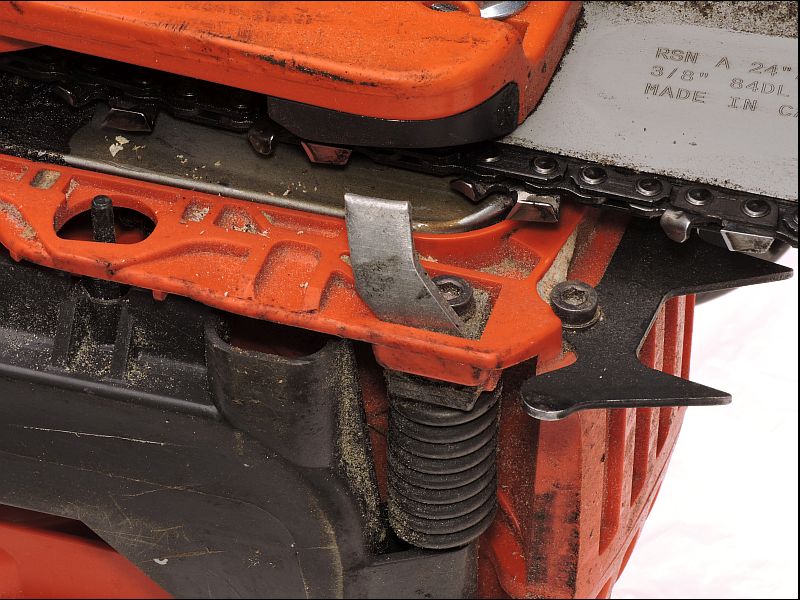
Above, it was stated that the chain 'may' need re-tightening. With a new chain, you will definitely need to re-tighten the chain. After the first 2 minutes of total cutting, it will likely need to be tightened... and again at 5 minutes and 15 minutes. Be sure that you have the tools needed to tighten the chain with you. Cutting with a loose chain is dangerous because the chain may come off of the bar. There are safety devices (like the aluminum chain-catcher in the photo below and the extra wide base under the rear handle) to minimize the risk of being cut by a thrown chain but they're not foolproof.
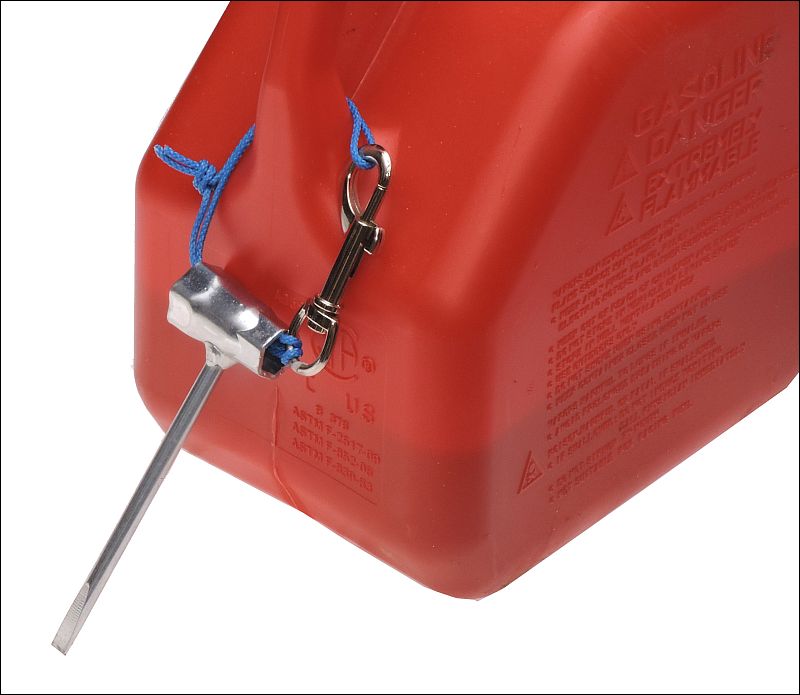
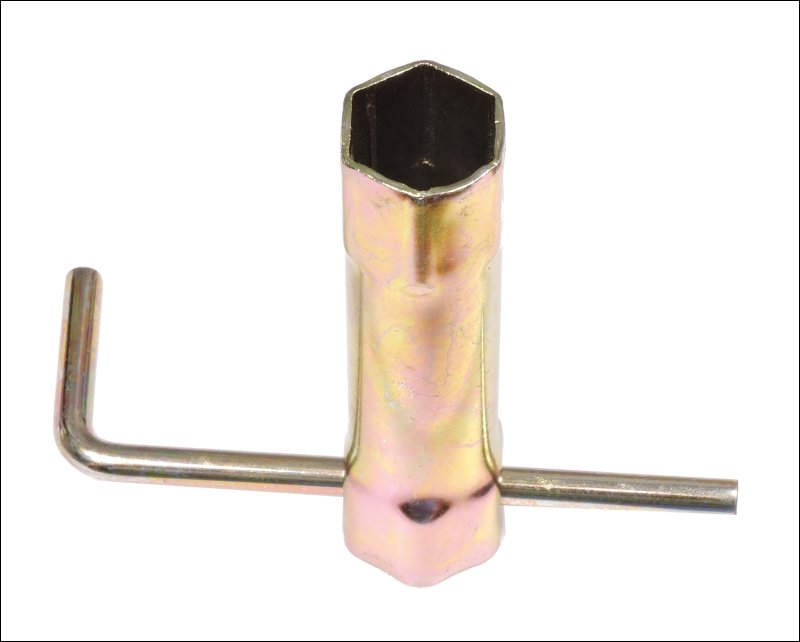
Most saws come with a tool (called a scrench -- below) that allows you to remove the spark plug and tighten/loosen the clutch cover nuts. Keep this tool with you when using the saw.
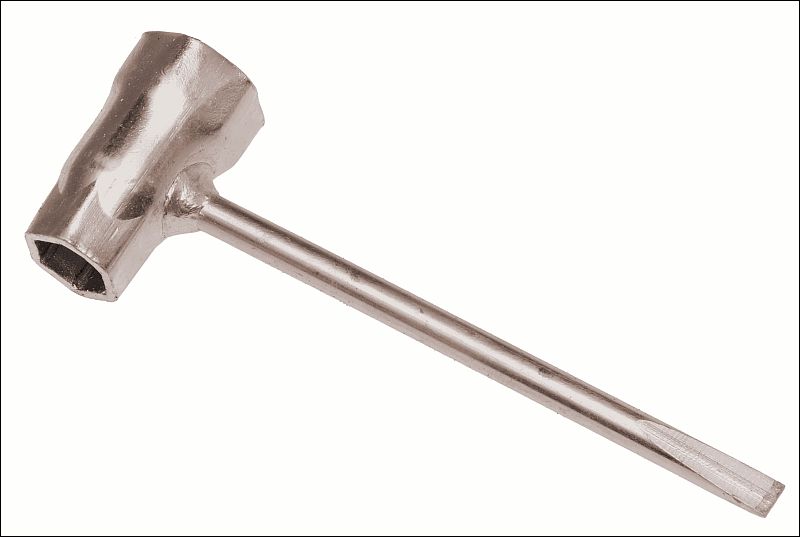
Some saws have an on-board holder for it but most don't. Find a way to be sure that you don't forget it. If you flood the saw and need to remove the plug or need to tighten the chain, you will need it.
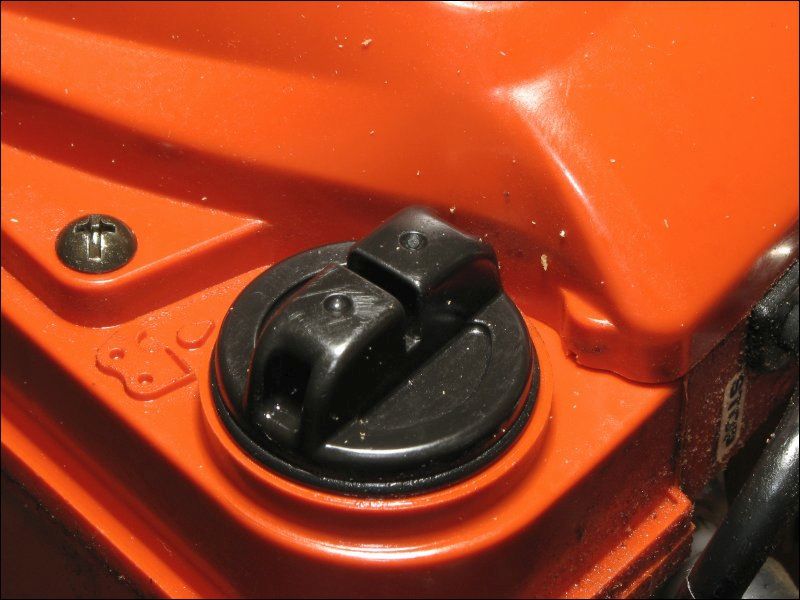
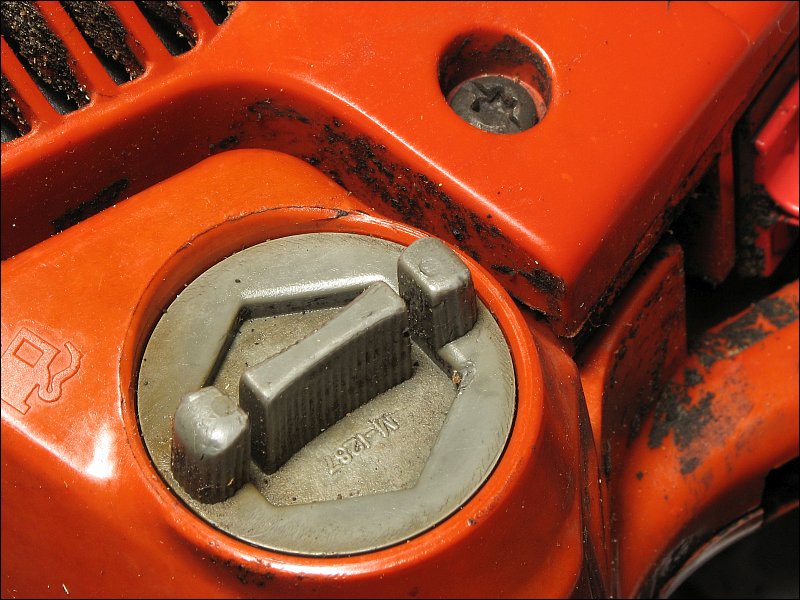
Don't Damage the Filler Caps:
This is mainly for those who borrow a chainsaw. When removing the bar oil and fuel caps, they can sometimes be difficult to remove. There is often a slot for a screwdriver. Don't use that alone. Use the slot with a screwdriver to assist you turning it by hand. It's likely just slightly too tight to turn with your fingers alone. A slight assist is likely all the help you need. Don't use a pair of pliers unless you use a rag between the pliers and the cap. Using the pliers directly on the cap will create burrs that will make it painful to turn the cap with your bare hand. If you borrowed the saw, you can be pretty sure that the owner won't appreciate any mods made to the fuel/bar oil caps. If you damage or lose the caps, you will have to buy new ones to continue using the saw. Even if you're finished, buy new caps before returning the saw to the owner. When tightening the caps, do so only finger-tight. That's all that's generally needed and will avoid having to use tools to remove them later.
One more note on borrowing a saw, or any tool... Don't make the owner ask for it to be returned. Return it promptly. Even if you had to order parts to repair something that you broke, return the saw and give/show the owner a copy of the receipt for the parts you ordered.
If you have the tool that was supplied with the saw, that often has a hex socket that fits the filler caps and can be used to loosen the caps. The one below is a generic wrench purchased from Lowes.
|
Bar Oil:
Do not run a saw without bar oil. It will destroy both the chain and the bar. Although any oil is better than no oil, chain and bar oil is best. It's a sticky oil that clings to the chain better than normal oils. When bar oil isn't available a constant constant viscosity (SAE 30 weight) motor oil can be used. Before you start to cut, you need to know if the saw has automatic oiling or requires that you pump the oil in manually. If you have to do it manually, consult the owner's manual to find their recommendations for application of oil.
When a saw is in good working order, there will rarely ever be any smoke from the bar or chain. If there is, it's likely that there is too much heat. This can be caused by the wrong oil, a dull chain or insufficient oil on the chain. Determine what the problem is before you damage the saw.
To confirm that the chain is being sufficiently oiled, run the saw while holding the tip of the bar about 4-6" from a surface that will allow you to see if oil is being slung onto it. When the oiler is working properly, you should see a fine mist of oil being sprayed from the front of the bar and chain. If there is no oil being slung, kill the engine and look at the chain to see if there is any oil on it. If it's dry, you need to repair the oiler (assuming that you've confirmed that the oil reservoir is full). Sometimes the oil pump needs to be replaced. Other times, the saw just needs to be cleaned (bar and chain removed and oil ports cleared).
|
|
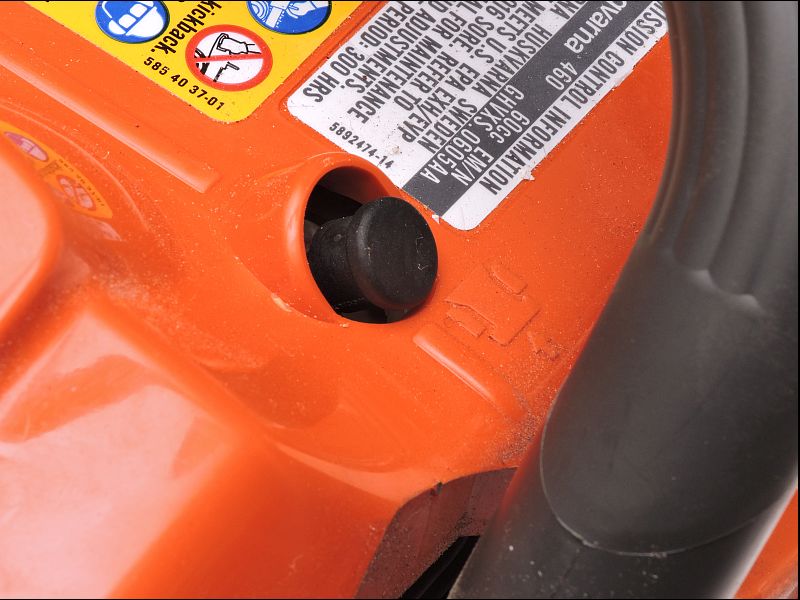
In the next photo, you can see a flat-head screw adjuster. Some saws (this is a Husqvarna 460 Rancher -- late model) have a feature that allows you to adjust the oil pump output. This is handy because you can use various bar lengths on the saw and shorter bars have shorter chains and require less oil. Setting the pump output correctly ensures that the chain is sufficiently lubricated and wasting of oil is minimized.
Fuel/Oil Mix:
2-stroke engines are used on most chainsaws because, in general, they have the greatest power to weight ratio and can be operated in any position/orientation (on their side, upside-down...). 2-stroke engines require that oil be mixed with the fuel. Use the correct oil/gas mix with oil sold under the same name as the saw. Any good quality 2-cycle engine oil designed for chainsaw engines will work but using oil from someone other than the manufacturer of the saw could result in a voiding of the warranty. Using the oil recommended by the saw manufacturer will ensure that it's the correct type. If you use substandard oil, an oil designed for 2-stroke outboard engines or the wrong mix ratio, it can cause engine failure. Using too little oil will result in damage to the cylinder. Using too much oil will cause excessive smoking and after extended use can foul the spark plug (oil fouling) or clog the muffler's internal screen (spark arrester). The spark arrestor is used to reduce the possibility for hot sparks/material to exit the engine, which reduces the possibility that you could start a fire. This was covered on page 11 (as listed in the directory) of this site.
When buying a fuel container for your 2-stroke mix, buy one with a clear marking as to where the one gallon fill level is. You can't always depend on the pump's metering. The 'one gallon' mark was mentioned. That's the amount that most homeowners will use when mixing 2.6 ounces of 2-stroke oil for a 50:1 mix (the most common mix for high-quality, modern saws -- find the owner's manual or look on the saw for the fuel/oil mix ratio for your saw). If you will need a larger quantity, buy a tank marked to match a commonly available bottle of oil to a 50:1 mix (or whatever you need). 2.6 and 5.2 ounce bottle of 2-stroke oil are available for 1 and 2 gallon cans, respectively. Larger quantities are available but, for me, not having to measure the oil (simply dumping the small bottle into the gas can) is more convenient. Having two small cans may be better than having one larger can. If you have 2 cans, you can empty one and then refill it. If you have to mix new gasoline with mixed gasoline (in a can that sill have fuel in it), adding the correct amount of oil may be difficult. If you have a completely empty gas can, you can get the correct mix.
Side note...
The No-Spill brand of gas cans are supposed to be some of the best (do your own research). The type with the nozzle that you have to push down to dispense fuel are awful.
Gasoline with Ethanol:
Much of the gasoline in the US has 10% ethanol. E85 fuel has 85% ethanol. There are some fuel stations that offer ethanol free fuel. Most saw manufacturers recommend gasoline with 10% or less ethanol. There may chainsaws that will run on E85 fuel but I haven't seen any. They would likely need to have a complex computer controlled carburetor to run E85. Saws can run on gasoline without ethanol and many people recommend it. If you want to run ethanol free fuel, you need to be aware that the first part of the gasoline dispensed may be a mix of whatever gasoline the previous buyer purchased and the ethanol free fuel. One gas pump locally states that the first four gallons could contain ethanol. If you want absolutely no ethanol in your saw, put the first few gallons into your vehicle (not for diesel vehicles, of course). Then fill the tank for your saw.
Filling Up:
Although amateurs (I fall squarely into that group) shouldn't be making risky cuts, an otherwise simple cut could become much more hazardous if you have to stop in the middle of the cut. This can happen if you don't have sufficient fuel in the tank to finish the cut. If you read the previous chapters in the directory, you know that an engine (especially a 2-stroke engine) will rev higher as the fuel-air ratio is reduced (too little fuel). This can happen when adjusting the carburetor or when you are running low on fuel. If you're cutting and you hear the engine speed increase at idle, you know you're running low on fuel and the saw could stop at any moment. Check the fuel often until you know how long to expect the saw to run on a full tank of fuel. Check the bar oil when you fill up with fuel.
It's also important to realize that some saws are nearly impossible to start after they're run out of fuel. Only after re-filling and allowing the saw to cool down will they restart. This is not something that you want to deal with when you need to complete a job and can be very dangerous if you have a tree cut to a point where it may or may not fall if a wind begins to blow (amateurs shouldn't fell trees in windy conditions -- winds are generally the weakest when the sun is nearest the horizon). This situation can be even more dangerous if you wear yourself out trying to get a saw started and then have to complete a cut when too tired to do so safely.
Battery Powered and Electric Chainsaws:
Above, it was stated that running out of fuel when making a cut can be dangerous. If you're using a battery powered saw, you should know that some saws slow down long before quitting but others simply stop when the battery monitor senses that the battery is getting low. If you have to make a cut that may be a problem if the saw stops in the middle of the cut, replace or charge the battery to ensure that you can finish the cut without the saw shutting down. With a battery powered saw, you should also realize that they sometimes have an overload protection feature. If you force the saw to work harder than it's designed to work, it could shut down and it could take several minutes for it to reset.
For mains powered saws, make sure that the saw cannot become unplugged if you inadvertently pull on the cord. On the saw end of the cord, you can tie the two cords together with a simple overhand knot. On the outlet end of the cord, you can tie it to something that will not easily move.
Keep the Fuel Can Clear of the Work Area:
It's an annoyance to have to walk any distance to fuel up your saw so you may have a tendency to keep the fuel close to where you're working. Don't. If you drop a tree on the can, it's going to be a huge fire hazard and will prevent you from working in that area for at least a full day.
Don't Confuse Bar Oil and Fuel Fillers:
In some saws, the fuel filler is in the front and some it's in the rear. If you use multiple saws with one configuration and then switch to a saw that's different, you could inadvertently add the wrong fluid to the fuel and oil tanks. Near each filler, there should be a symbol that looks like either a fuel pump (think gas station) or a chain link. These tell you which to use for each fluid.
Using the Right Sized Saw:
Some 'guys' may want to use a large saw to prove how manly they are. You should be aware that larger saws are typically heavier. For some jobs, you will need a saw with a long enough bar (and enough power) to cut the largest diameter logs you have. If you have a large tree to cut up, it's typically best to have at least two saws. One will be big and heavy and will wear you out quickly but necessary for some of the cuts. For trim work, you'll want a much smaller saw. A 12-14" saw can do much of the limbing and trim work. The smaller saw will induce much less fatigue.
Use a Properly Maintained Saw:
Before using the saw, you should also check the air filter. Some allow tool-less access, for others, you may need the tool supplied with the saw or a flat screwdriver. Most modern saws use centrifugal force to expel the larger bits before the air is sent to the filter. This significantly increases the time between required filter cleanings. For paper filters, you should tap them on a hard surface to remove the biggest part of the dust. Many people will use full air pressure from their compressor to blow the dust out from the inside of the filter. For paper filters, this can open the pores in the filter, allowing larger particles to get into the engine. This may be OK at low pressure but it's generally frowned upon. Mesh filters can be washed with soap and water. You should consult the manufacturer of paper filters to see if they suggest washing with soap and water.
There's not much worse than having to fight with a saw that won't start. Sometimes after fighting with it to start, you're too worn out to do any work. Before you take a saw out to a jobsite, be sure that it starts easily. If you have trouble starting it and finally get it running well, don't assume that the saw will continue to start easily. Many times, you'll get it running and it starts well after it's hot but when it cools, it's again difficult to start. Double-check starting before you take the saw out to do any work. You may also want to see if the saw starts properly after it's laid on either side. I have a saw that, when laid on the chain side will flood and is nearly impossible to start if it's cold. If you find that your saw has some similar issues, avoid whatever causes the problems.
Although it may not seem too important (especially for saws that won't idle), you need to make sure that the kill switch operates smoothly and works 100% of the time. As soon as you finish the last cut in a given location (where you don't have to walk to the next piece you'll be cutting), kill the engine. If the saw is running properly, it will be easy to restart.
Finicky Engines:
It's important that you know how to start a finicky saw under varying conditions (cold start but ran in the last few days; cold start and hasn't been run for a long time; hot start...). Saws, especially older saws may require a very strict starting procedure. It may need to be choked and pulled only one time, then un-choked and pulled until it starts (2-4 pulls). Sometimes, the same saw may flood if choked. If you're not completely familiar with a saw and will need to rely on it. Start it in all possible scenarios (cold, hot, hot with varying intervals of time between starts. Too many people travel to do work or have multiple friends come to help and the saw that you relied on won't start or is unreliable. If possible, try to have multiple chainsaws on hand when getting the job done on time is critical. Even if only one person will be operating a chainsaw, having a back-up (or two) reduces the level of frustration if one saw quits.
Of course, the caution above is for saws that run perfectly (idle and high-speed) after they're running, not a saw that has problems that need to be repaired.
Engaging the Chain Brake:
Previously, the chain brake was mentioned regarding kick-backs. Many of those who teach chainsaw safety recommend that you engage the chain brake whenever you're not actively cutting. This also prevents you from developing another very bad habit, revving the engine while walking. If the saw isn't running well enough to idle, repair it. The problem is generally a dirty carburetor and/or hardened diaphragms. You can buy a carburetor kit for less than $10. Virtually anyone capable of doing this type of work can install the kit in 15-20 minutes (add time for soaking the carburetor if it's gummed up). If the chain brake isn't working, repair that as well... and use it.
Leave the Carburetor Adjustments Alone:
When a saw won't start, many people immediately start trying to adjust the carburetor. If it was running as it should when previously used, the starting procedure may be the problem. If the carburetor needs to be repaired, or cleaned, that's something that may require more than you're willing to do. If the saw isn't yours, ask the owner before taking it to a repair shop or doing any work on it.
For reference:
When a saw is improperly stored, the carburetor can get gummed up with fuel that's deteriorated. Don't start trying to adjust the carburetor. If it was running well with the settings previously, it should do so again. If you are the owner of the saw or have permission from the owner and you suspect that the carburetor is gummed up, you can disassemble the carburetor and look for signs that the old fuel has turned to 'varnish'. If the carburetor shows no signs of bad fuel but the diaphragms are stiff (especially the metering diaphragm), you can buy a 'kit' and replace the diaphragms and gaskets). If the fuel has turned to varnish, remove the diaphragms and gaskets and soak the carburetor. You can use carburetor 'dip' but you may be able to clean it up with mineral spirits. Soak overnight if possible. When you remove it from the soak, blow it out with compressed air. There is virtually no risk of doing any damage with the compressed air other than possibly blowing the internal fuel filter screen out of place. If the metering diaphragm or the fuel filter diaphragm is stiff, hard, damaged, replace them. These need to be extremely flexible to work properly. If you're reading this site from top to bottom, you've already read the various small engine pages and cleaning or rebuilding the carburetor shouldn't be a problem. If you found this page through a search engine, click the arrows near the top or bottom of this page to load the site properly. This page is item 23 in the directory.
Note:
When dipping a carburetor, you generally remove the high and low speed adjusters. Before backing them out, very gently turn them in until they stop. Very carefully count the number of turns until they bottom out. When reinstalling them, set them precisely where they were when you removed them.
On many small engines, the carburetors have no adjustments other than the idle speed adjustment. When the saws have other adjustments available/accessible, they're generally visible on the side of the carburetor and are marked H and L (high speed adjustment and low speed adjustment). For those without adjustments, the carburetor is set at the factory. For some of the newer saws, there is an electronic adjustment. The engine has several sensors (like an automobile) and a microcontroller makes real-time adjustments to help ensure peak performance. This, in theory (when working as it's designed) can be a nice feature when the saw will be used at very different altitudes and in varying weather conditions. With a standard setup, you may have to make slight adjustment to the carburetor when conditions change significantly.
Compression Release:
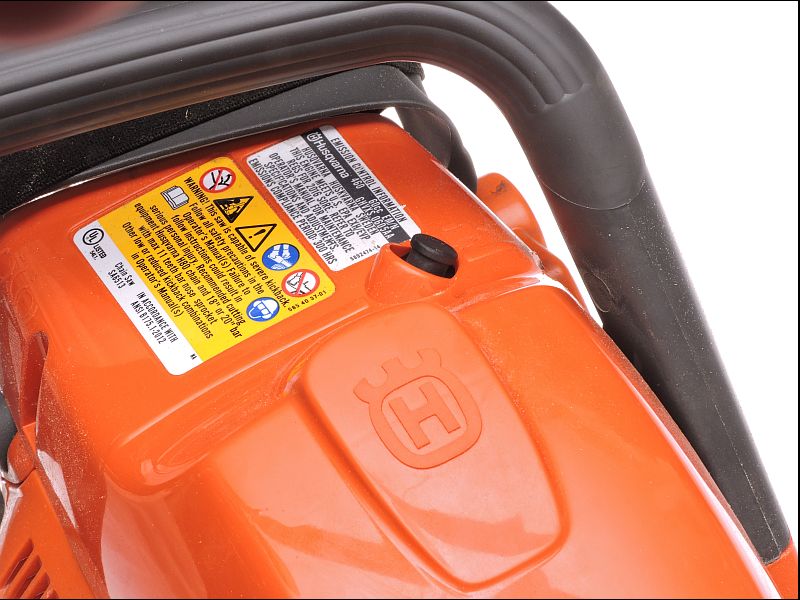
Small saws are relatively easy to pull-start. This is not the case for higher performance and/or larger saws. These saws require much more effort to pull them through the compression stroke. To make starting easier, some saws have a compression release (black button on Husky 460 below). The release allows some of the compressed fuel/air to be vented. When the engine starts or tries to start, the release is disabled (full compression enabled). If it tries to start but does not, you will have to reset the compression release again. If you're trying to start a saw that you know to be in good working order but it seems to be far too hard to pull-start, find the owner's manual or look for a compression release on the side of the engine. For those with an automatic compression release, you don't have to do anything to activate the release. It's automatically activated when the engine isn't running.
Getting the Most From the Saw:
When cutting with a chainsaw, you need to find the point where it cuts most efficiently. Some saws perform best at high RPMs. Others have better low end torque. You need to find the sweet-spot for your saw. Many (most) modern saws can rev to about 13,000 RPMs but that's not where they make the most horsepower. Many produce the most horsepower at about 9,000 RPMs. For those saws, you need to load the saw so that it's in the 9,000 RPM range when cutting. For older saws or really large saws, the maximum RPMs may be much lower. You don't have to know the exact RPM that the saw is cutting best. When you find the sweet-spot, it will cut the quickest.
Side note...
to get the saw to cut most efficiently, you'll have to put a bit of force on the bar. A small amount of force. If you have to apply significant force to make the saw cut, something is wrong. It's likely that the chain is dull .
Load Bearing Chains, Cables, Ropes and Straps
Unless you're working with relatively small logs, you'll need a way to move them. If you're working around your home, you may be able to use your lawnmower/tractor. If you're out in the woods, you'll likely use a 4x4 vehicle (a two-wheel drive vehicle with street tires has virtually no pulling power off of the pavement). No matter what you use, you'll need a way to connect the truck/tractor to the logs. This section will cover some of the devices you can use.
Abusing Equipment:
Before we go into chains, cables and their strength, you should know that it's VERY difficult to break a chain or cable (of the appropriate size) unless you're really abusive or make the wrong connections between sections of chain/cable. If you think ahead, you shouldn't have to do any 'jerking/snatching' (running head-start with a slack chain to get the logs moving) to move anything you cut with a chainsaw (remember, this page is for amateurs who aren't likely going to be cutting old-growth redwoods). Even the most powerful 4x4 dually has limits because, even on dry pavement, there is a limit to the grip that the tires have.
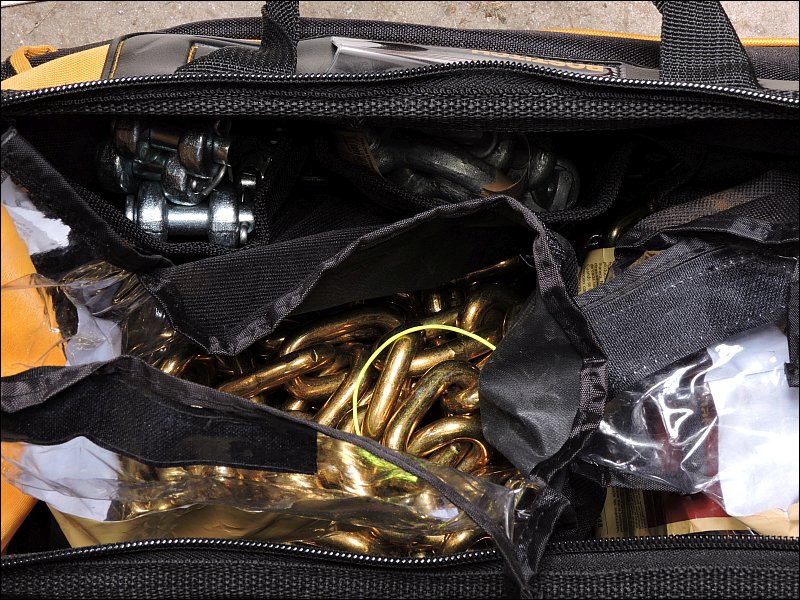
Take care of your equipment. This not only applies to chainsaws and other common tools. Straps and chains can be damaged by the elements. Exposing them to sun and moisture won't immediately cause them to fail but it will reduce their service life. If nothing else, buy 5 gallon buckets with lids to keep them dry if you have to leave them exposed to the elements (in the back of your truck, etc... Black buckets will generally block UV better than lighter colored buckets so they will protect straps and coated cables better. Of course, if you leave anything in the back of an open truck, you have to be careful not to leave it where those items could be stolen. Straps can be damaged over time if they get saturated with mud and left to dry. If your straps get muddy, use a pressure washer to clean them and let them dry thoroughly before you store them.
Be Careful when Looking at Ratings:
When comparing metallic and synthetic pulling components, you have to be careful to look at the rating specifics. Many will list tensile strength which is generally the point where the material will break. Others list MWL (maximum working load) or SWL (safe working load). If you see an ad for a nylon strap rated for 10,000 pounds and a chain rated for 5400 pounds, don't blindly believe that strap will be stronger unless both are for the same ratings. If the chain is rated for a SWL of 5400 pounds, it may have a safety factor of 4:1 which means that it breaks at over 20,000 pounds. If the strap's 10,000 pound rating is breaking strength, not SWL, The chain will hold up to more steady force than the strap.
Chain Size:
The size of a chain is the diameter of the metal stock from which the links are made. The actual diameter may be a bit larger than the rated size but they're close. For example, one chain manufacturer gives the diameter of their 1/4" chain as 0.274 instead of 0.250. Knowing this will allow you to measure the chain you have to determine it's size if you need to buy hooks or anything else that will attach to the chain.
Chain Grades:
For this section, strength comparisons are for chains of equal size. Not all chains are the same. The weakest are the ones with links that are not welded where the ends of the link come together. These are typically good for nothing more than decoration. Chain with welded links come in various grades. Welded chains with no markings are typically 'utility' chains and often have a SWL (safe working load) of just over 500 pounds for a chain with links that are just under 1/4" (a commonly packaged size). For 'graded' chains, the lower the grade the weaker the chain. Grade 30 is not as strong as grade 70 (industry standard grade for transportation tie-downs) which is not as strong as grade 120 (a very expensive specialty grade of chain). They all have their uses. The grade 30 may be strong enough for all but the most abusive user. Grade 43 chain is widely available and relatively inexpensive.
By any other name...
Some chains have names that are used interchangeably with their grade. Grade 30 is also referred to as 'proof coil' chain. Grade 40 and 43 are also known as 'high test' chain. Grade 70, 'transportation' chain. Knowing this can help take some of the mystery out of buying poorly marked chain in big box stores.
Many chains are bare metal and will rust very quickly when they are exposed to moisture. You can coat the chains with something like silicone spray to inhibit rusting. Or, you can buy a coated chain. One advantage of grade 70 chain is that the yellow chromate plating (required to allow quick identification by the DOT as grade 70 chain) will also help inhibit rust.
Marking the Chain Ends:
When you have lengths of chain in a pile, it can be time consuming to repeatedly find the end (especially when there is no hook or anything else to help find the end). To make it easier to find, you can mark it. Many people paint the last foot or so with fluorescent paint. You can also tie a marker to a link near the end. If you use a string or some type of cord (yellow Z-Line used below), tie it to the center of a link (where it won't get crushed) and apply a drop of adhesive to keep it there. If you have individual bags/boxes for each chain, drop the body of the chain in first, leaving the ends at the top.
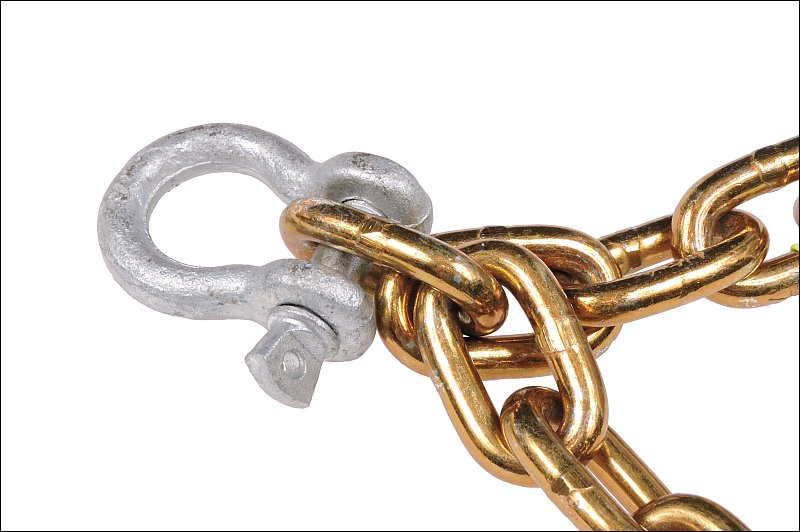
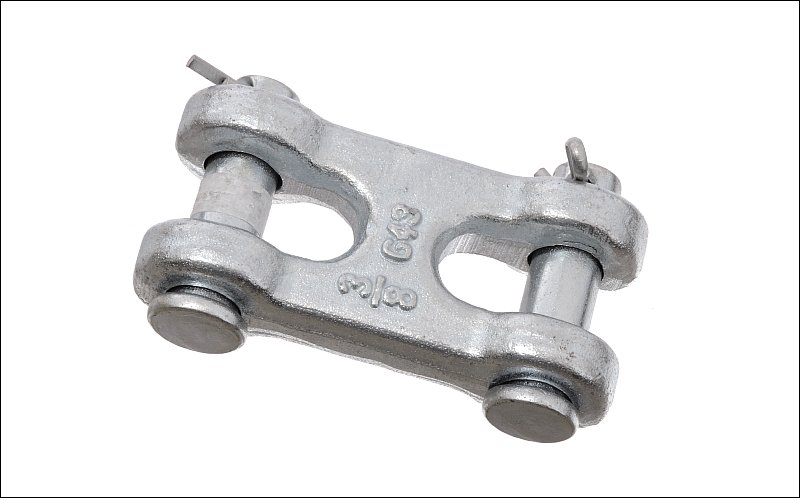
When buying chain, you need to look at the proportions of the links if you want the most options when connecting to it. Short link chains may not allow you to insert something like a large enough quick-link or shackle into the links to use the chain at or near the chain's SWL rating. In the photo below, look at the shackle and the links. You would insert the shackle so that it pulls the link against the loaded link, not against the link on the loose end. For this example, you would pull against the run of chain that's going from the shackle down to the lower right of the photo. The one going up and right would put a side load on the link which would reduce the capacity of the chain.
Weight:
Weight of chain is one of the most significant problems using it. For example, 5/16" chain weighs about 1 pound per foot. You probably don't want to have to lug around 20ft of it all day. Personally, I have a 10ft section of 1/4" chain that I use as a choker. I prefer it to a strap because the chain can take much more abuse when dragging a log over rough ground, rocks and roots of other trees. The 10ft section is manageable. If I need a longer section, I can connect a strap to it.
Nylon Straps:
Nylon straps are commonly used when pulling. They're strong and lightweight compared to cable or chain. They can be dangerous when improperly used but when used properly and within their limits, they're safe. When using straps, you have to do whatever you can to prevent damaging them. Even small tears can significantly reduce their strength. You would never use them to pull against anything with a sharp edge. This includes metal with a square cut edge. If you have to pull against something like that, you'd have to put some sort of buffer between the metal and the strap.
Straps come with several types of ends. Some have metal hooks. Others may simply have the strap folded back and sewn to itself to make a loop. When using the fabric loops, you should be careful not to use anything that could damage the strap. Some metal hooks have flashing left from the casting or forging process which could cut the surface fibers. If you see something like this, knock down the sharp edge with sandpaper. You can also use devices like shackles. These are generally smooth and safe to use. If you have to use straps where there will be abrasions, buy ones with liners inside the loops.
Casting and forging were mentioned above. All else being equal, the forged version is typically going to be more rugged and less likely to have defects. This isn't really an issue unless you're using the components for overhead lifting.
Rope:
Rope can be used for pulling but there are many different types and you need to know what you're buying. Ropes made of braided material like polyester or nylon are strong but are often fragile in that they will quickly become ratty looking and dirty. Sheathed ropes are typically going to hold up to abuse better. Ropes made of specialty fibers like UHMWPE (Ultra-High Molecular Weight PolyEthylene -- sold under the names Dyneema and Spectra) are typically much stronger than nylon and polyester but are more expensive as well. If you decide to use rope, you should know that knots can significantly reduce the strength of the rope. Like cable (wire rope), you can buy sections of rope with properly spliced eyes (with and without hooks). If you're using rope that can be spliced, the manufacturer may have instructions online for making a proper eye-splice.
Cable (wire rope):
Cable can be used but you should know that it's much more dangerous than other choices. When cable breaks under tension, it will fly back towards its anchor points at very high speed. Anything in its way will be damaged and if a person is in the way, they can easily be killed. Nylon rope and strap also fly back when they break but since they have much less mass, they're less likely to cause damage. If they don't break and simply come loose, the flying hook on the end can do significant damage. Chain is another option. It's heavy to work with but it's fairly safe. When chain breaks, it's generally just falls where it is (unless tied to something with a lot of spring tension in it). If you think that you might break a cable, you can throw a heavy canvas tarp over it. If the cable breaks, the tarp will absorb much of the energy. No matter what you do, stay well away from the cable when it's under tension.
Tree Savers:
A 'tree saver' is typically a wide strap that's designed not to stretch. They're often made of polyester instead of nylon because polyester doesn't stretch much. That's important to prevent damaging the tree. The reason you need to use a tree saver (as far as the tree is concerned, and sometimes where laws protect trees) is because only a thin layer just under the bark of the tree delivers all nutrients to the top of the tree. If this is damaged by a cable or chain, the tree will often be killed. The tree saver helps to prevent this.
Quick-Links:
Quick-links allow you to insert a link or connect two chains. There is a gate that opens to allow other components (chain, cable, rope) to be inserted. Then the gate is screwed closed. When you buy these, don't necessarily buy the size for the chain that you have. For example, if you have 1/4" chain, don't buy 1/4" quick links unless that's the largest that will fit through the opening in your chain. These are typically smaller than the specified size and only rated at about the same load as the lowest rated welded chain. If you are buying chain, find the largest link that will fit through your chain (3/8" quick links will fit through the opening in the 1/4" chain that I purchased) if you're going to be doing any heavy pulling (not rated for overhead lifting). When using these at their limits, you need to tighten the nut with a wrench. If you do not, the link will be bent and generally made unusable after you use a wrench to open it.

Shackles:
Shackles are very useful. 'Anchor or 'bow' shackles (below) have a large opening (bow shackles typically have a larger opening than anchor shackles) that allows a choker to be made. This shackle has a screw pin. Others have straight round clevis pins or bolts. 'Chain' shackles have a straight profile instead of a round internal profile like the one below. As for the quick-links, these can get 'stuck' after being stressed. If you don't have a multi-tool, carry a small adjustable wrench with you so you can open the shackle (or quick-link) in the field. If you don't have a pocket for it, you can hook it on a belt loop with a carabiner or a bolt snap (as was shown for the scrench previously).
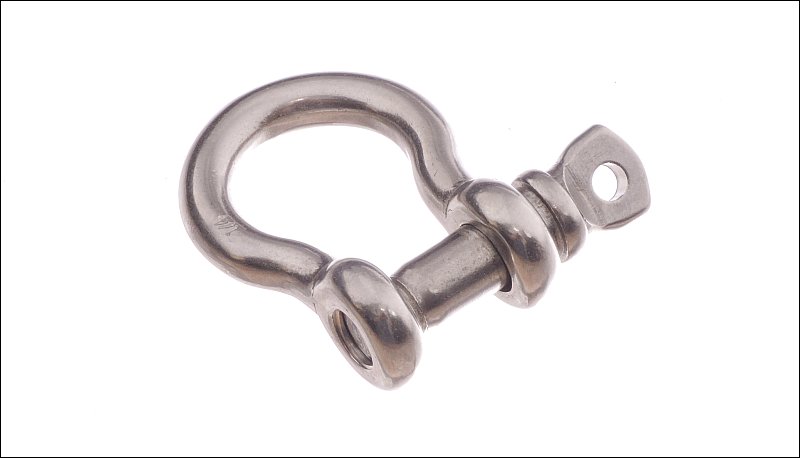
Screw pin shackles are generally used for temporary duty. For long term, shackles with bolts with nuts are typically used. In the photo above, you can see a hole in the screw pin. This is used to secure the pin from turning. A wire is passed through the hole and them wrapped around the leg of the shackle. This prevents it from unscrewing.
Chokers:
You've very likely seen an example of a 'choker', as in a dog's choker collar. The choker is designed to tighten when pulled. This is handy when you need to attach to irregular objects like logs. You can use almost anything as a choker but something wear better than others. Straps and chains can be used without damage. Cable can be used but if used in too tight of a radius it can be bent (permanently). Repeatedly doing this can weaken the cable.
Pre-Rigging:
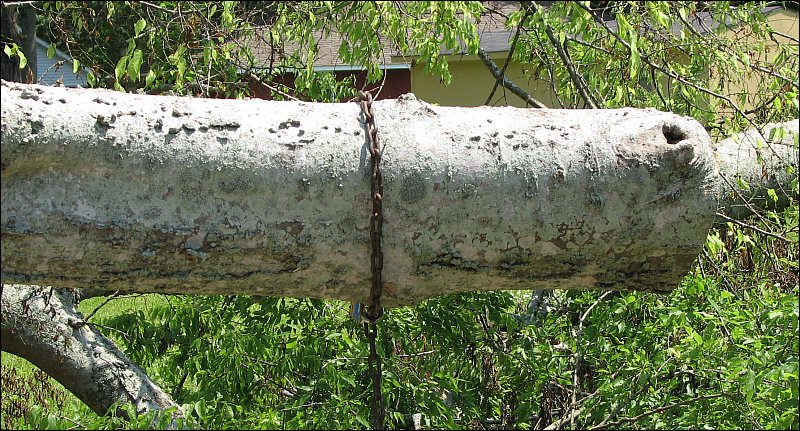
When you're going to cut a suspended branch that's relatively straight and is going to fall flat on the ground, you may want to wrap a choker around it (well away from the cut) before you make the cut. That way, the log/branch is already rigged and you don't have to fight to get a chain or strap under it. Rigging it first also has the benefit of being able to pull on the piece with a truck or tractor without having to get near/under a piece that didn't fall as expected and is dangerous to be near.The following images shows a choker on a branch that's about to be cut.
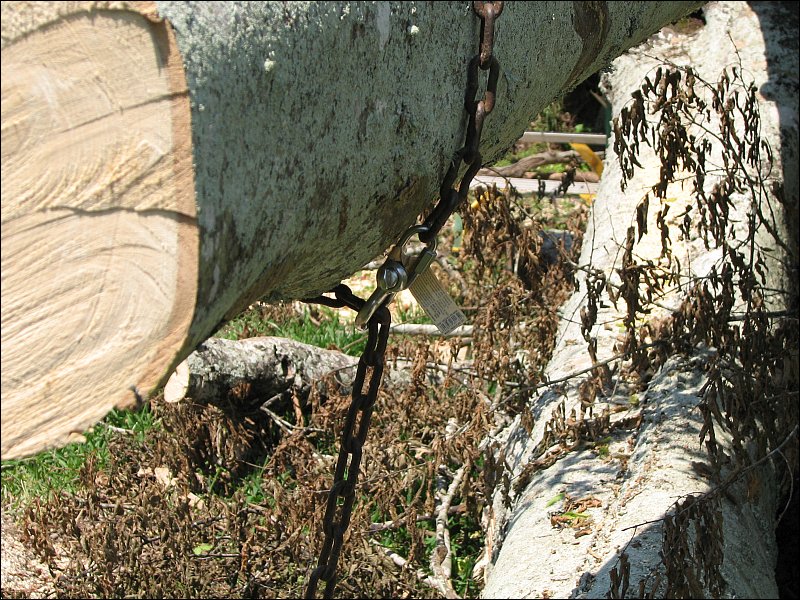
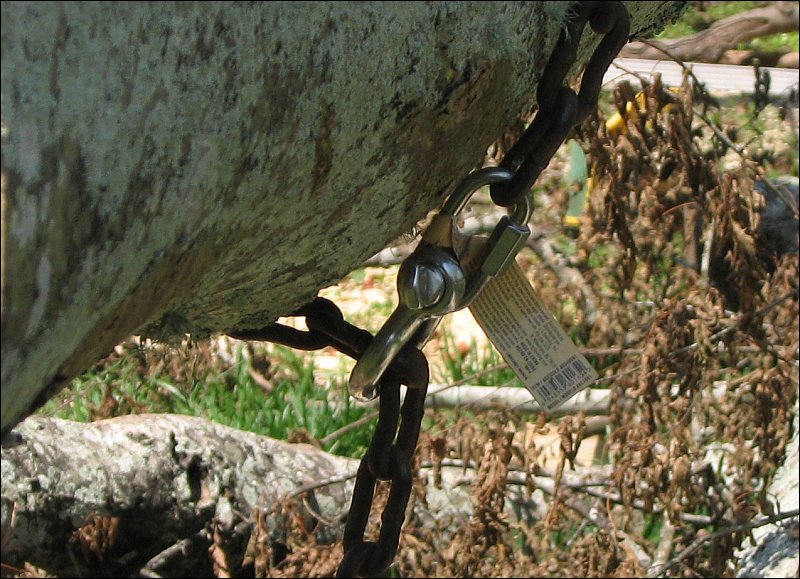
If you look at the rigging above, you can see that the shackle is relatively high (compared to being well below the branch). This is done to make the loop as tight as possible so that it's less likely to slip before you begin to pull on it. If the shackle was hanging 2 feet below the branch, it would have to slip around the branch quite a bit before it tightened up enough to prevent it from slipping.
Log/Timber Jack:
A log jack is a tool that's used to grab a log and pull it up onto it's support leg. This is done to get the piece off of the ground to make it easier to cut without the risk of cutting into the ground. These are OK for small logs but if you have larger logs, you either have to buy one of very high quality or use it to simply roll the log. Cheap log jacks will break if stressed. One that I purchased could likely have been bent by the average 12yr old... girl. It was rated for logs in excess of 13". Unless it was balsa-wood, there's no way that it would have survived.
Hooks:
Chain hooks vary in two general ways. 'Slip' hooks have a large round opening that allows a loop to tighten down on whatever is being pulled. A 'grab' hook (below) is made for a specific size chain and is designed to hook onto one of the links in the chain and not slip (second image). Hooking the chain onto itself like this leaves an open loop that's not binding (unless you make a 'round turn' on the object). The grab hook can also be used to adjust the effective length of the chain. this is an advantage over virtually all of the other devices that you will pull with. This grab hook has a clevis pin to attach it to a chain. Some hooks have a round eye instead of a clevis pin. Those are generally used on straps. If used for chain, a suitably rated connector must be used to attach the chain to the hook.
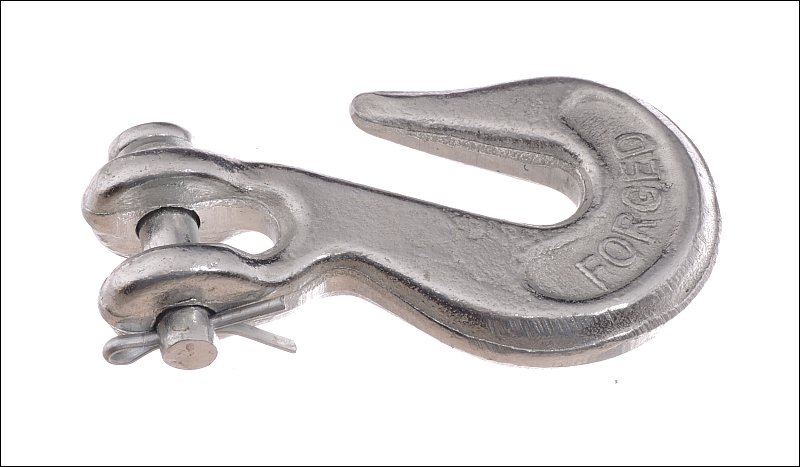

The clevis pin above is prevented from backing out by a cotter pin. The cotter pin must be properly installed (bent so that it cannot fall or be pulled out). If the pin comes out, at the very least, the shackle will be destroyed. At worst, it will go flying when it breaks loose under tension and kills someone. When bending the cotter pin, rotate it so that you're pulling away from the body of the shackle. If you do it where the pin can rotate, it's going to be much harder to bend properly. If the cotter pin feels weak because it's been bent too many times or because it's rusty, replace it.
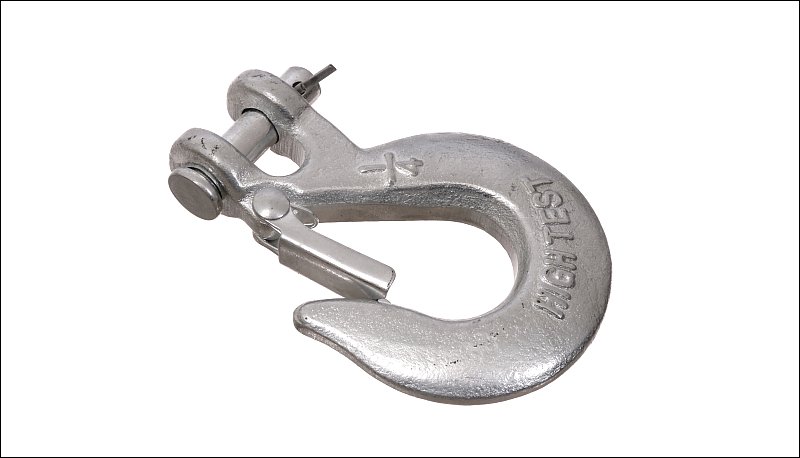
The following is a slip hook with a latch/retainer. These keep the hook from becoming disconnected from whatever is in the hook. Bear in mind that the latch isn't load bearing. If stressed in virtually any way, it will be badly bent. Replacements are rarely available and if the latch cannot be straightened, the hook will have to be replaced.
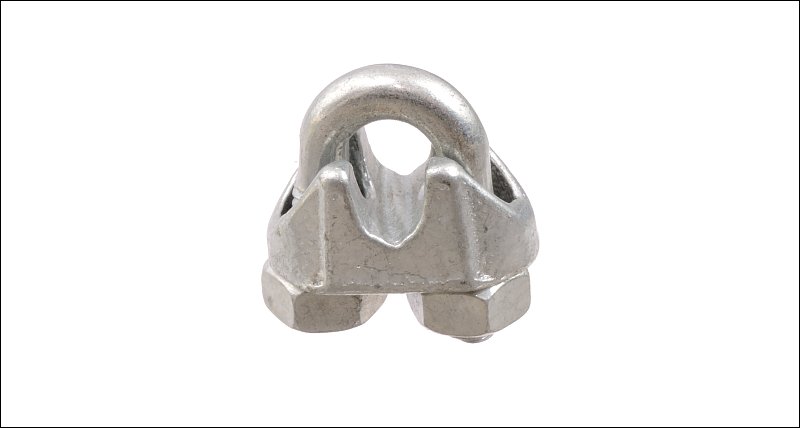
Here, chains, straps and cables have been mentioned. Of those, cable and chain can be repaired. Many times, things fail because they were used improperly. For example, if a cable is wrapped around an anchor point and hooked back onto itself, it will likely be weakened or break at the point where the hook contacts the rest of the cable. If a cable is damaged like that, you can cut the bad end off it and repair it (with either crimps sleeves (crimped with a proper crimping tool) or cable clamps - more correctly known as wire rope clips -- below).
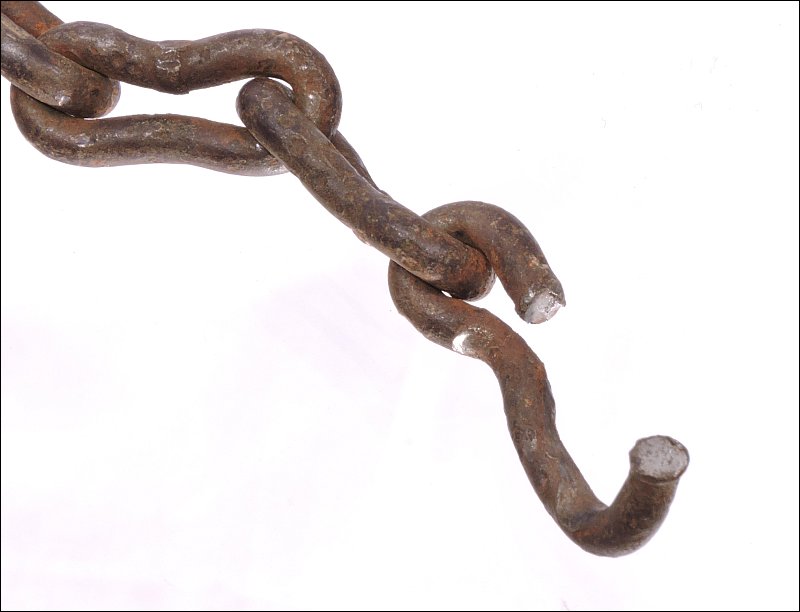
Chain is also repairable. If the end is damaged, you can cut the damaged part off and reinstall the hook (or whatever was on it). If it's damaged in the middle somewhere, there are several options. It can be repaired with a quick link but the chain's load rating will drop to whatever the quick link is rated for (which is typically far below the chain's rating). If you want to maintain the original rating, you can use a chain coupler (double clevis link) of equal or greater rating of the chain or install hooks on the two new end-points where the chain broke (after removing any damaged links). Bear in mind that this is for a chain that was damaged due to improper stress on it at one point. If the chain was pulled hard enough to break it, it needs to be replaced if used in a critical situation. The next image shows a chain damaged by improper use. You can see that the broken link was crushed in on the other side.
The coupler below is for 3/8" chain and is grade G43. If used for grade 43 or lower chain, the chain will retain it's original rating. If used for a higher grade of chain, the chain will now only be equal to grade 43 since the chain is only as strong as the weakest link.
This was mentioned before but it bears repeating...
If you don't have a tarp (or heavy blanket), anything that will absorb the energy of the heavy object on the end of the strap/chain/cable will work. Also be aware that using a recovery strap with only nylon loops can still be hazardous if the tow-point on the vehicle breaks loose from the vehicle. The tarp works well because it has some weight and acts as a sail to slow down the hook. If you don't have anything like that, you can use a smaller rope or heavy string (nothing with more than about 100lbs breaking strength) to make a 'safety chain' of sorts. Tie the string to a secure point on the vehicle (not the one being used to pull the vehicle) and to the eye in the hook if you're using a tow strap. If you're using a chain, tie the string to a link in the chain a foot or so from the vehicle. If the hook comes off, the string will eat up most of the energy. The string will be broken as the vehicles move apart but that's better than having the hook flying freely. You want to use something relatively weak so that when it breaks, there will be little energy to send the hook flying. This may seem excessive but flying hooks, shackles... can kill.
Vehicle Recovery
If you're working off of pavement, it's likely that you'll get stuck. There are several ways to get un-stuck. Most require another vehicle pull you out. This can be pleasant or very unpleasant. When getting pulled out, it's best to be 'winched' out if badly stuck. If you don't have a winch on the stuck vehicle, you'll have to find someone who does. Winching requires a heavy vehicle on pavement/solid ground or the winch vehicle tied off to a tree or other solid anchor point. The pull is nice and slow and does little to no damage as long as the winch is connected to a suitable point on your vehicle.
Other methods are not quite as smooth. Although I prefer chains for a lot of things, this is one thing that recovery straps excel in. Recovery straps are designed to stretch and are typically made of nylon instead of polyester. If the recovery vehicle has good enough traction, the pull will not be too unpleasant because the tow vehicle can pull you out slowly. Getting 'snatched' out is more violent. If you use a chain or a polyester strap, when the slack in either is taken up and the recovery vehicle is moving fast, expect a very sharp jerk (many times, if you are not belted in, you'll be bounced between the seat and the steering wheel -- or vice-versa in the pulling vehicle). This is not only unpleasant but can damage both vehicles. If a nylon recovery strap is used, is large enough to handle the stress and is attached properly to both vehicles, using the strap is safe and much more pleasant than using a chain. Using the strap, the recovery vehicle (assuming that it cannot get enough traction to pull you out slowly) will get a short running start and when all of the slack is taken out, continue to pull for a few seconds at the end of the strap, repeating this until the stuck vehicle is free or until it's determined that some other method will be needed. The added momentum (inertia?) of the moving vehicle and the stretch in the strap allows a less jarring and more forceful pull. Understand that recovery straps are designed for this. If you use something like a choker, lifting strap or tree protector (none of which are designed to stretch) the results will be much like when a chain is used. Many people will buy the highest rated recovery strap available. Recovery straps need to be selected with regards to the vehicle that's likely to need the strap to be recovered. If you buy one that's rated too high, it will not stretch and will act more like a chain than a recovery strap.
Vehicle tie-down points are not always suitable for recovery of the vehicle. Many times, they are OK to gently pull the vehicle out if it's not badly stuck. They are rarely strong enough to pull a vehicle from deep mud, especially when the vehicle is 'high-centered' or when the vehicle is buried to the axles. For those types of recovery, you must use recovery points. Never tie around a bumper. It's almost certainly likely to damage the vehicle.
VERY IMPORTANT!
In some instances, a tow strap will have a large hook that may not fit properly in the tie-down points on a vehicle without proper tow hooks. If you try to pull with just the tip of the hook in the tie-down hole, you risk having the hook slip. This can be fatal if the hooks hits someone when it comes off. When you have this type of situation, use a shackle or quick link to go through the tie-down and attach the hook to that. Don't use something like rope to go through the tie-down. The metal typically has a sharp square edge and will cut the rope, again sending the hook flying.
Duct Tape is Your Friend:
In many instances, you will have a hook or loop that won't stay just as it's needed, especially when the pull requires that the cable/chain/strap go from tight to loose repeatedly. If you need to make sure that a grab hook needs to stay securely engaged in the chain or a tow strap be held precisely on the center of a tow hook (recovery point), you can use duct tape to hold everything in place (actually, virtually any tape will work -- electrical, masking...). Like the latch on the slip hook it won't hold a load, of course, but it will keep things properly positioned so that they can work as needed.
One more note...
This section is mainly here for when 'you' get stuck. If you are pulling someone else out, you have to be careful with regards to lawsuits. If it's someone that you do not know, it's probably best that you let someone else help. If it's someone that you do know, at the very least, let them make the connection to their vehicle (you check the connection before pulling). If it's someone you know well, let them drive your vehicle to pull their vehicle. That greatly reduces the chance that they can say that you damaged their vehicle because you pulled too hard.
Types of Cuts
This page is mainly for those having to deal with a fallen tree on their property so there won't be much telling you how to fell one.
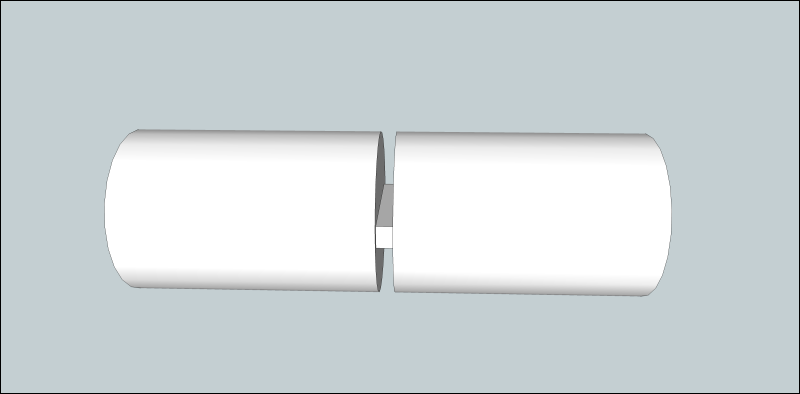
Compression and Tension:
The term 'compression' was used above. When something like a branch isn't supported uniformly along its entire length, there will be tension along some areas and compression along others. Think of two cylinders oriented horizontally and a hinge at the center of the junction between the cylinders. In the image below, if the left cylinder were rigidly supported and the right cylinder left to hang on the hinge in the middle, you can clearly see that there would be compression below the hinge and if there were material about the hinge, it would be stretched (tension). When cutting, you can start a cut on the tension side but you have to stop before the kerf closes and the saw gets pinched. This is what you have with a hanging branch.
What if the outer ends were supported in the image above? This is similar to what you might have with a branch or trunk on the ground. If the ends are supported, you would have tension on the bottom and compression on top. It's often difficult to tell where force is applied and when you cut through too far from the wrong side, it pinches the saw.
Using the Top of the Chain to Cut:
Saw manufacturers generally recommend having the powerhead tight against the piece you're cutting. This is less fatiguing and makes controlling the saw easier. This is easy when using the saw normally and cutting with the bottom of the chain. When making cuts upward, it's more difficult to have the saw tight against the wood. Using the top of the bar to cut is perfectly OK as long as you know that it's somewhat more dangerous since cutting with the top of the bar causes the saw to push back towards you. If you're off balance, the saw could actually get under you and you could fall on top of the saw. This is more likely to happen if you're a smaller person and the saw is relatively powerful. Before trying to use the top of the bar, use the bottom but without the powerhead against the wood. This will give you an idea of how rough the cutting will be and the force involved. If you cannot easily keep the powerhead off of the wood, you may not want to try using the top of the bar.
If you do use the top of the bar, keep your fingers and thumbs tightly wrapped around the handles and keep your left hand squarely behind the hand guard. Holding it like that will give the chain brake the best chance of stopping the chain if the saw catches and drives itself back towards you.
Felling Wedges:
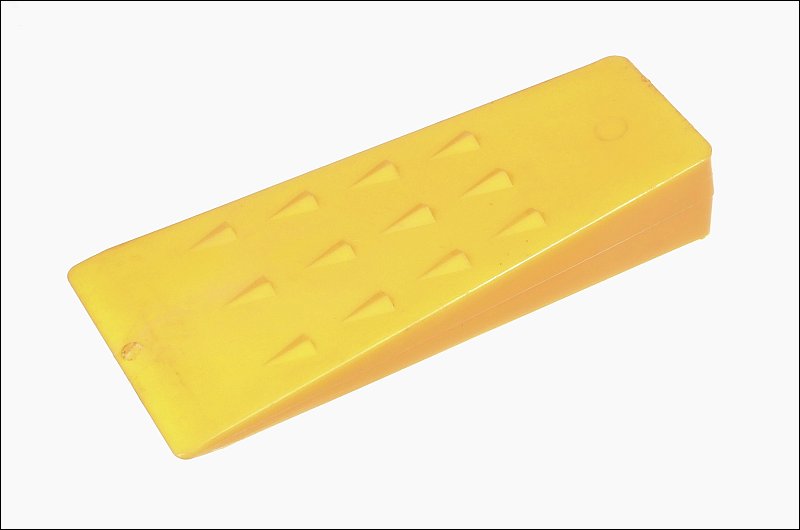
When cutting, it's likely that you'll misjudge the stress on a limb or will have no choice but to cut on the compression side of a limb and you will get your saw stuck. The wedge can be used to hold the kerf open to prevent the saw from getting jammed. Most cutters use polymer wedges because they're lighter than metal wedges and won't damage the chain if you make contact with it. The one below has barbs on one side. Most are smooth or lightly textured on both sides. You should have both. The wedge size you'll need will be determined by the size of the trees you're working with.
When using wedges, you will need a way to hammer them into the kerf. For light-duty work, you can use a second wedge as a hammer. When you really have to drive it deep into the kerf, you'll need to use a hatchet or single-bit axe (single-bit, one side for cutting, the other side for hammering). You could carry/use a small maul but a hatchet (or similar) can serve other purposes so it's a better option, especially when you have to carry everything you need with you.
Standard Bucking Cuts:
Let's say that you have a limb or section of trunk that's obviously hanging so that the compression is on the bottom and the tension on the top. When cutting this, it's generally best to cut from the bottom first, up no more than about 1/3 the diameter of the piece. Then you cut down from the top to meet your first cut. This makes the cut cleaner in that there is no tearing of the bottom of the wood as the weight of the wood begins to exceed the strength of the remaining wood (ahead of your saw).
Twisting Risks:
When cutting branches or anything that isn't a straight, clean piece from the cut to the end of the piece, you have to be aware of twisting. For example, you may look at a branch and determine correctly where the compression and tension are but don't look at the load on that branch (are there more smaller branches on one side and fewer on the other side). It's best to clean up anything that you intend to cut but it's not always possible. If the piece that you're cutting is more heavily loaded on one side than the other, that piece can twist when cut. The twisting could cause the cut end to come back and hit you or jam the saw. When possible, cut as muck of the small stuff off as possible and work your way beck from the smaller diameter pieces to the larger diameter pieces.
Sticking a Saw:
Getting a saw stuck is always a possibility. It's not good to go with only one saw. If you get a saw stuck and cannot free it with wedges or lifting/pushing/pulling on the area being cut, you may have to cut it free. There are multiple ways to do this. The simplest is to have a second saw. It doesn't always have to be a large, powerful saw. A decent battery powered saw (newer cordless saws are good enough for this) could be enough to cut enough wood to free your saw. A hatchet or axe could do it but that would be a lot of work. Having a second chain and bar for your saw (~$30) may allow you to simply unbolt the stuck bar and bolt on the new bar and chain. If you do this, be sure to move the other chain as far out of the way as possible while cutting. You wouldn't want to hit it. It could fly back at you. After un-mounting the powerhead, it may be possible to pull the bar and chain out separately. If the bar wasn't far enough into the cut to allow the use of a wedge, removing the bar (after the powerhead removal) may allow the use of a wedge to open the kerf.
When cutting the other bar out, you don't want to make the same mistake so you have to determine why you misjudged the piece you were cutting. If you were cutting from the top, you'll likely what to cut from the bottom since the top side is likely the compression side. In some instances, as you cut through the piece, it will move straight back and close down on the saw. Cutting through again will likely result in sticking a second saw or bar. To free the bar, you could pull on the branch to open the gap. Wedges may help you free it. Using an axe or hatchet to gently pry the gap open may free it. For more difficult times, you may have to cut more of the small end off of the piece to allow it to fall away from the bar.
Watch for the Tendency to Roll:
There are multiple things that can cause a log to roll unexpectedly. The most obvious is the terrain. When bucking, it's important that you look at the slope of the ground. When you're not working on level ground, it's generally best to be on the uphill side of the piece being cut. Other things to look for are branches below the piece being cut that the cut piece could fall onto and slide down (towards you). If you have a piece with a weight-bearing branch supporting it but you cannot see it due to brush around it or the angle you're looking from, when you cut it loose from the rest of the trunk, it could be driven right down onto you. This is why you need to have a clear work area and need to think about what you're doing.
Dropping the Tree Where You Want it to Fall:
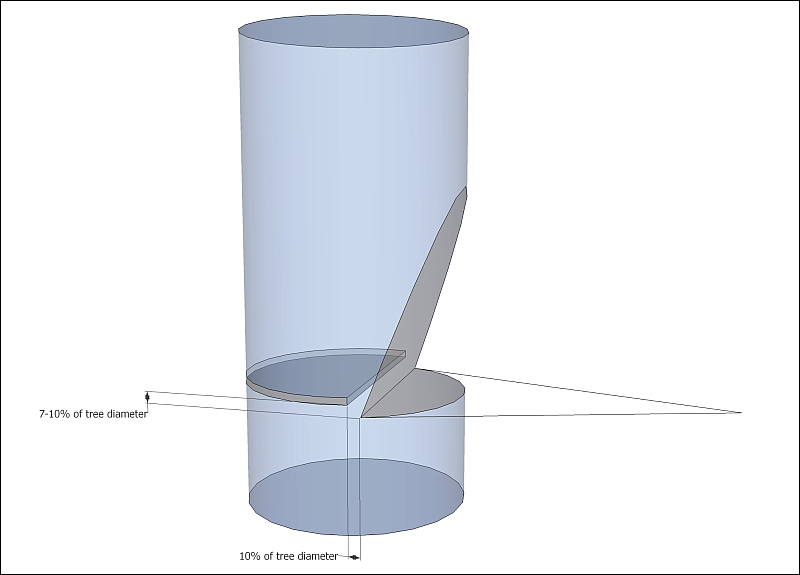
There are numerous techniques for making a tree fall where you want it to but the most common is to cut a notch on the side where you want it to fall. The notch is typically flat on bottom and has an opening of about 70 degrees. The notch is cut to 80% of the tree's diameter. To finish the cut, you start cutting from the other side of the tree about 7-10% of the tree's diameter above the flat part of the notch. You want to cut above the flat of the notch so that a 'hinge' will be formed and force the tree to fall in the right direction without slipping back. The back cut is cut to leave a hinge of about 10% of the tree's diameter. When the back cut starts to open, you immediately back away from the tree and very closely watch it's movement. Falling trees can do some strange things. Of course, this is only a VERY basic description of the technique used to cut relatively small, healthy, straight trees. The percentages are rough figures only. They will vary by species and condition of the tree.
If you cut a notch and when you back cut you do it in a way that forms a hinge (like you would when felling an entire tree), the limb will swing down and toward the notch. It's not foolproof but it's an option when it would be preferable to have the limb somewhere other than directly below the cut.
In the previous image, there are two intersecting lines that extend from the notch. These show the direction that the tree will fall if the notch is cut properly.
For those who are new to this type of work, getting the notch cuts to meet precisely may be difficult. To make it easier, cut the flat part of the notch and then make multiple angle cuts until you get back far enough to meet the flat part of the notch. Making multiple cuts allows you to make corrections and get the notch as perfect as possible. Remember, the hinge is the most important part of the cut. The open face notch is the front part of the hinge. It has to be right. When making the back cut, you may have trouble judging where to cut. You can scribe a line with the blade. Start on both sides at the back of the notch and work your way around. Remember that you'll need to cut about 10% of the diameter of the tree above the bottom of the notch. Bear that in mind when using the scribed line as a guide for the back cut.
Felling Spikes:
In the next photo, you can see a row of spikes parallel to the bar. These are called felling spikes. When jammed into the side of the timber being cut, they hold the saw in place. When cutting, many manufacturers recommend (when practical) that you have the powerhead of the saw tight against the trunk of the tree (leaving virtually none of the moving chain exposed which can reduce the risk of injury). When the spikes are embedded in the wood, they limit the movement of the saw and form a fulcrum to swing the saw around. For some saws, the exhaust exits straight forward from the powerhead and into the wood. If the cut takes a long time, the hot exhaust can melt the cowling on the saw and could ignite the wood. If you use the felling spikes, set the saw so that the exhaust isn't constantly building heat between the muffler and the tree.
Rotten/Hollow Trees:
While it's possible to judge with some certainty where a healthy tree will fall, that's not possible with most rotten or hollow trees. For any tree that falls into that category, allow a professional to put the tree on the ground. Most will drop a tree for a relatively small fee. After it's on the ground, you can limb and buck the wood as needed. Limbing is removing the limbs from the trunk, typically right at the trunk. Bucking is cutting the larger pieces to length.
Trees with Foreign Objects Embedded:
This is more likely a problem in an area where there was farming or maintenance on equipment was done but can be anywhere. Sometimes people stick something in a tree and forget about it until it's too late to remove it. The following are examples from a single tree. One image shows a grinding stone and file. The other is a chain. Hitting either of these would have damaged the chain and could have thrown pieces of metal that could have injured anyone nearby.
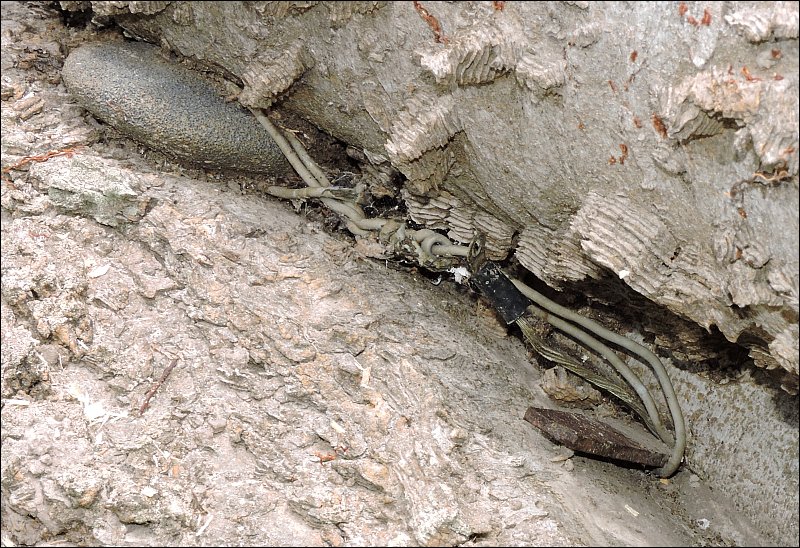
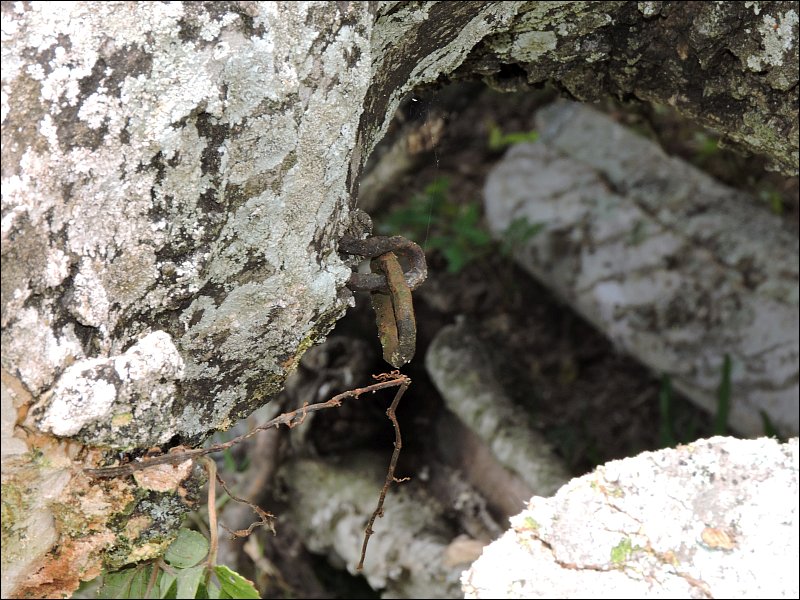
When a chain is sharp, it makes small chips much like you'd see when using a surface plane on wood. When starting work, this is likely what you'll see if your chain was in good condition. In the first image below, you can see that the chain was sharp and making good chips. the second photo shows what the saw was producing after hitting a nail in the trunk of a tree. After hitting the nail, the saw immediately went from making chips to dust. There's no point in trying to do any significant work after the chain has been dulled. If you have only 1 or 2 small branches to cut, you may be able to get that done but trying to do real work efficiently is pointless. You'll either need to sharpen the chain or replace it.
Sharpening the Chain with a File and Guide:
The cheapest way to sharpen a chainsaw chain is probably to use a file and guide. You can find them at virtually any hardware store. You'll have to buy the right size for the chain you have. The package will have instructions and you can find many tutorials on the internet (youtube, etc). Here are a few tips... As you know, getting a sliver of metal in your eye is bad. For regular carbon steel, a small piece will dissolve (oxidize). It will be uncomfortable but for very small pieces, it's not catastrophic. Chainsaw teeth are made of a rust resistant material which means that metal filings from them won't easily oxidize (you WILL have to have a doctor remove it). When filing, it's possible for a wind/breeze to blow shavings back into your face. Safety glasses don't (rarely) form a complete seal and if they do, they fog badly. When filing the teeth on a chainsaw, saturate the teeth and the file with Armor-All or something similar. It's a thick liquid that will trap the filings. Re-apply every 5-10 teeth. Apply to the top and bottom of the file in the guide.
When filing, only apply pressure to the tooth (with the file) on the forward stroke. If you don't pull the file off of the tooth in the reverse direction, you will reduce the life of the file. When filing, rotate the file a few degrees in the guide to use the entire perimeter of the file.
When replacing a chain or using a chain after it's been sharpened, you should be cautious. The saw may behave completely differently. If you've gone from a chain considered to be a safety chain to a chain not classified as a safety chain, be especially careful when using the nose of the bar. Safety chains will help guard against kickback. Non-safety chains will kick back more violently in some situations. Perform a series of various types of cuts with the tip of the bar. This should be done in the safest possible conditions (flat ground, solidly held timber, no risk of hitting anything other than the piece you intend to cut...). Make normal down-cuts first before trying to cut from the bottom. After you make a few cuts, you will know what to expect when cutting under less controlled conditions. If you're not comfortable with the way the saw handles, buy a different chain. They're only about $15-20 for most saws and there's no point in risking injury for so little cost.
Leaning Trees:
Trees generally require that gravity cooperates to drop where you want them. If you have a tree that's leaning any way other than in the direction that you want it to fall, you should leave it to a professional. If you have no other choice, you can use a 4x4 truck or tractor to pull it in the right direction. A 4x4 truck is a better choice because the back end of a truck will be pulled up off of the ground since it will be pulling from high up in the tree (higher gives the pull more influence on the tree). A 4x4 can pull with its front wheels when the back-end gets light. Bear in mind that the chain, nylon strap or rope will need to be longer than the tree is tall if you don't want the tree on the equipment pulling the tree. When pulling, use something that's much stronger than you think you will need. A ski-rope is useless for most all pulls of this type. Small nylon straps are easily broken. Something rated for 10,000 pounds wouldn't be overkill. When looking for rope to do this type of work, search for 'rigging' rope. You should also be aware that ropes are weakened if knotted. If you have to make a connection in the rope, it's best done with a properly spliced eye with a hook. Don't hook around the rope or strap itself. Where the hook contacts the rope or strap is another point that is weaker than the rating of the rope/strap. Use a choker with an eye on each end and hook into those eyes.
Initially, it may seem like a chainfall or come-along is a good idea for pulling a falling tree in a particular direction. They may work to prevent a small tree from falling back but they won't help much pulling it forward because they lose tension almost immediately when the tree starts to move towards it.
Bore Cuts:
One of the most useful cuts for me is one where you bore into the center of the log/branch/whatever and then make two more opposing cuts on top and bottom of the log about 1-2 inches from the bore cut. When you do this, any stress in the piece will show up. It will show you where to expect the kerf to open up (and where it will get pinched) so that you can cut on the tension side so your saw doesn't get stuck. Bore-cutting is very useful when done properly and can also be used to prevent barber chairing. After you've read this page, you can do more research on more advanced cutting techniques.
It's important that you know that you start any bore cut with the lower half of the end of the chainsaw bar. Using the upper half is very likely to result in a dangerous kickback.
Barber Chair:
I'm including this term because it's used often but not always explained. When the trunk splits (often leaving the tree trunk perched on top of the remaining part of the splintered trunk), it's called 'barber chairing'. This is dangerous because it leads to unpredictable breakage of the trunk. Barber-charing is most commonly an issue for trees with a pronounced lean. As was stated above, a special cut is generally used for trees that may split. When the tree is leaning, the wood in the trunk on the side opposite the lean is under severe strain. It's trying to spring outward but cannot because there isn't enough force to break the wood fibers. When you make the back-cut, you cut the fibers. As soon as enough of the fibers are cut to allow enough force for the outer wood to break away from the inner wood, the wood springs outward (often with deadly force). This is similar to a spring type catapult. The outer part of the trunk is like a trigger for the loaded catapult spring. Making the back-cut is the same as pulling the trigger for the catapult while standing in the way of the catapult arm. For the amateur, it's generally best to have a professional to put trees on the ground (especially, non-typical trees) and make sure they're stable. From there, bucking and limbing can be done.
Return the Saw in Good Working Order:
If you borrow a chainsaw, return it with a sharp chain. Either buy a new one (about $20) or have it sharpened by someone who knows how to sharpen a chain. Either way, test the saw to confirm that the chain is cutting well before returning it. When you borrow it, ask the owner if they want it returned full of fuel and bar oil. Some people rarely use their saw and don't want it stored full of fuel (which can go bad and gum up the carburetor). If they don't want any fuel in it, empty the tank and run it until it runs out of fuel. The bar oil can leak out of some saws and if the saw you borrow is one that leaks, return it with a quart bottle of bar oil (about $5 for name-brand oil or about $8 for a gallon of generic at Wal-Mart).
If you buy a new chain for the saw because you received it with a chain too dull to work efficiently and you dull the new chain, have it sharpened before returning it. Generally, you can get a lot of life from a properly oiled chained but some things can dull it. One very common way to dull it is to let it dig into the ground. Doing this only one time can make a difference. Doing it repeatedly will make the chain useless. Besides dulling the chain, the sandy component of the soil will wear the bar. Another way you can dull a chain is if you hit something in the tree. Sone trees have had cable supports or anchors for things like swings. When these are no longer connected and time passes, the tree can grow over them. Hitting them with the saw will dull the teeth. If you're going to be cutting something that's known to be nasty (like used railroad ties), have several chains on hand or get a carbide chain. They are expensive and typically cut slower than normal chains but will last longer than standard chains when cutting abrasive materials.
This has been stated before but bears repeating... Don't ask to borrow tools from those who use those tools to make a living. If you don't return it on time or break a tool, it could be a serious problem for them.
Other Suggestions
Stay Well Hydrated:
Stay hydrated and don't forget to eat. Sports drinks are a good choice when it's hot because they replace lost electrolytes (zero or reduced calorie drinks if you're diabetic). If you're like me, you need to drink more than you think you do. If you are perspiring heavily and that stops, you are likely getting dehydrated and need to take in more fluids. Another thing I have to think about is eating enough (not a problem, generally). For some reason, I don't feel hungry until well after I should have eaten. What works best for me is to keep canned soup in the truck. The type with pull-tops are easy to open. A plastic spoon and you can eat out of the can. Simple, balanced and filling. I grab a can about once an hour if working hard. If nothing else, they are great to have as a backup. They don't need refrigeration and unless the can gets damaged, they are good for months. Of course, you'll need to find what works best for you.
First Aid Kit:
At the very least, you need to keep antibacterial ointment and band-aids on hand. Keep them in a safe place where they cannot get wet. A zip-lock type bag (with all excess air forced out before zipping) can protect them pretty well. For a better stocked kit, gauze pads and adhesive tape are good to have. To wash out any large scrapes or scratches, something like Betadine is extremely effective at cleaning wounds and preventing infection. Peroxide is better than nothing but some claim that it can destroy cells needed to begin healing. Alcohol is an effective antibacterial but it's painful when applied to open wounds (anything that bleeds). Saline washes are good at flushing the wound initially. Most 'wound washes' have a fairly strong stream to aid in cleaning. Topicals like the Lanacane spray below help prevent infection and relieve pain.

The container below is waterproof (if undamaged) so it makes a good first-aid kit container. There are larger ones, if needed. This one holds band-aids, Neosporin, tape and saline eye drops. Even if you wear safety glasses, you'll eventually get an eye full of something. Don't apply the eye wash as you might with Visine or other drops. Flood the eye with it repeatedly. Then, if you want to use a drop or two of something like Visine, do so.
The tape below (Medipore H, by 3M) is one of the best I've ever used. It's flexible and sticks very well. It's expensive if purchased from a medical supply distributor but cheap on eBay (~$7 per roll). Leave it in it's sealed package until needed.

It's likely that you'll get splinters. A good pair of tweezers comes in handy. I have never tried it but 'drawing salve' is supposed to help get stubborn splinters to the surface. Do some research before trying it.
For minor cuts, what's important is that you clean the wound and apply an antibacterial ointment. The bandaging isn't critical as long as the wound is kept clean. Many times a clean paper towel or napkin and electrical tape will do a good job. Apply the ointment so that whatever you use cannot stick to the edges of the wound (which would open it when you remove the bandage). Then tape securely. If the wound becomes infected, don't wait to seek medical help. Some infections can spread quickly.
Insect Repellant:
Don't wait until you need it to think about buying it. If you live in an area where lime disease is an issue, you need to apply insect repellant before you step off of the pavement.
Dress Properly:
Clothing was mentioned earlier but it was related more to safety with regards to the chainsaw. It's also important to dress properly for other reasons. Lime disease was mentioned above. For the best protection, you should use an insect repellant with the highest concentration of the active ingredient. This is generally DEET. Some people are sensitive to DEET and higher concentrations can cause problems. When doing manual labor in the hotter seasons of the year, it is not always best to go with shorts and short socks (often don't show above the top of the shoe). When going into an area where there are ticks, wear long socks that stay up (or keep them pulled up) and long pants. Tuck the pants into the socks and spray a heavy concentration of insect repellant onto the socks and legs of the pants.
Back to the Top
|

